What is change data capture (CDC)?
Change data capture (CDC) is a data integration pattern that captures changes made to data in a source system, such as inserts, updates, and deletes. These changes, represented as a list, are commonly referred to as a CDC feed. You can process your data much faster if you operate on a CDC feed, instead of reading the entire source dataset. Transactional databases such as SQL Server, MySQL, and Oracle generate CDC feeds. Delta tables generate their own CDC feed, known as a change data feed (CDF).
The following diagram shows that when a row in a source table that contains employee data is updated, it generates a new set of rows in a CDC feed that contains only the changes. Each row of the CDC feed typically contains additional metadata, including the operation such as UPDATE and a column that can be used to deterministically order each row in the CDC feed so that you can handle out-of-order updates. For example, the sequenceNum column in the following diagram determines the row order in the CDC feed:

Processing a change data feed: Keep only the latest data vs. keep historical versions of data
The processing of a changed data feed is known as slowly changing dimensions (SCD). When you process a CDC feed, you have a choice to make:
Do you keep only the latest data (that is, overwrite existing data)? This is known as SCD Type 1.
Or, do you keep a history of changes to the data? This is known as SCD Type 2.
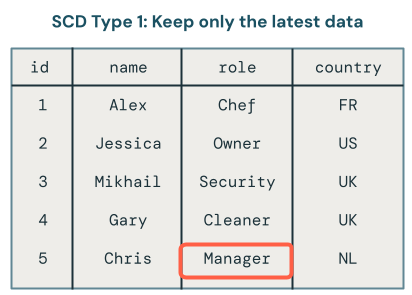
SCD Type 1 processing involves overwriting old data with new data whenever a change occurs. This means that no history of the changes is kept. Only the latest version of the data is available. It’s a straightforward approach and is often used when the history of changes isn’t important, such as correcting errors or updating non-critical fields like customer email addresses.
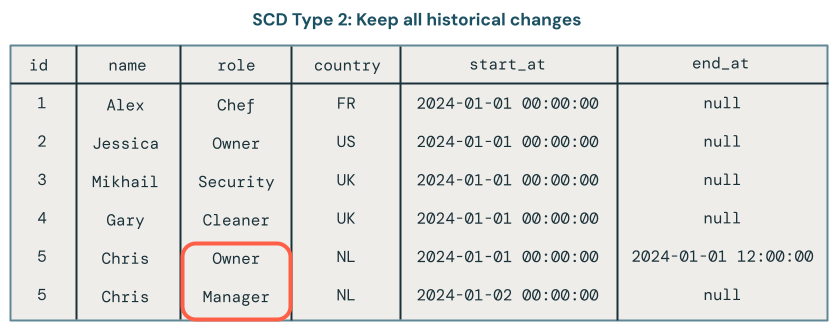
SCD Type 2 processing maintains a historical record of data changes by creating additional records to capture different versions of the data over time. Each version of the data is timestamped or tagged with metadata that allows users to trace when a change occurred. This is useful when it’s important to track the evolution of data, such as tracking customer address changes over time for analysis purposes.
Examples of SCD Type 1 and Type 2 processing with Delta Live Tables
The examples in this section show you how to use SCD Type 1 and Type 2.
Step 1: Prepare sample data
In this example, you’ll generate a sample CDC feed. First, create a notebook and paste the following code into it. Update the variables at the beginning of the code block to a catalog and schema where you have permission to create tables and views.
This code creates a new Delta table that contains several change records. The schema is as follows:
id- Integer, unique identifier of this employeename- String, name of employeeage- Integer, age of employeeoperation- Change type(for example,INSERT,UPDATE, orDELETE)sequenceNum- Integer, identifies the logical order of CDC events in the source data. Delta Live Tables uses this sequencing to handle change events that arrive out of order.
# update these to the catalog and schema where you have permissions
# to create tables and views.

catalog = "mycatalog"
schema = "myschema"
employees_cdf_table = "employees_cdf"

def write_employees_cdf_to_delta():
 data = [
   (1, "Alex", "chef", "FR", "INSERT", 1),
   (2, "Jessica", "owner", "US", "INSERT", 2),
   (3, "Mikhail", "security", "UK", "INSERT", 3),
   (4, "Gary", "cleaner", "UK", "INSERT", 4),
   (5, "Chris", "owner", "NL", "INSERT", 6),
   # out of order update, this should be dropped from SCD Type 1
   (5, "Chris", "manager", "NL", "UPDATE", 5)
   (6, "Pat", "mechanic", "NL", "DELETE", 8),
   (6, "Pat", "mechanic", "NL", "INSERT", 7)
 ]
 columns = ["id", "name", "role", "country", "operation", "sequenceNum"]
  df = spark.createDataFrame(data, columns)
 df.write.format("delta").mode("overwrite").saveAsTable(f"{catalog}.{schema}.{employees_cdf_table}")

write_employees_cdf_to_delta()
You can preview this data using the following SQL command:
SELECT *
FROM mycatalog.myschema.employees_cdf
Step 2: Use SCD Type 1 to keep only the latest data
We recommend using the APPLY CHANGES API in a Delta Live Tables pipeline to process a change data feed into an SCD Type 1 table.
Create a new notebook.
Paste the following code into it.
The employees_cdf function reads the table we just created above as a stream because the APPLY CHANGES API, which you’ll use for change data capture processing, expects a stream of changes as input. You wrap it with a decorator @dlt.view because you don’t want to materialize this stream into a table.
Then, you use dlt.create_target_table to create a streaming table that contains the result of processing this change data feed.
Finally, you use dlt.apply_changes to process the change data feed. Let’s take a look at each argument:
target- The target streaming table, which you defined previously.source- The view over the stream of change records, which you defined previously.keys- Identifies unique rows in the change feed. Because you’re usingidas a unique identifier, just provideidas the only identifying column.sequence_by- The column name that specifies the logical order of CDC events in the source data. You need this sequencing to handle change events that arrive out of order. ProvidesequenceNumas the sequencing column.apply_as_deletes- Because the example data contains deletion operations, you useapply_as_deletesto indicate when a CDC event should be treated as aDELETErather than an upsert.except_column_list- Contains a list of columns that you don’t want to include in the target table. In this example, you’ll use this argument to excludesequenceNumandoperation.stored_as_scd_type- Indicates the SCD type you want to use.
import dlt
from pyspark.sql.functions import col, expr, lit, when
from pyspark.sql.types import StringType, ArrayType

catalog = "mycatalog"
schema = "myschema"
employees_cdf_table = "employees_cdf"
employees_table_current = "employees_current"
employees_table_historical = "employees_historical"

@dlt.view
def employees_cdf():
 return spark.readStream.format("delta").table(f"{catalog}.{schema}.{employees_cdf_table}")

dlt.create_target_table(f"{catalog}.{schema}.{employees_table_current}")

dlt.apply_changes(
 target=f"{catalog}.{schema}.{employees_table_current}",
 source=employees_cdf_table,
 keys=["id"],
 sequence_by=col("sequenceNum"),
 apply_as_deletes=expr("operation = 'DELETE'"),
 except_column_list = ["operation", "sequenceNum"],
 stored_as_scd_type = 1
)
Run this pipeline by clicking Start.
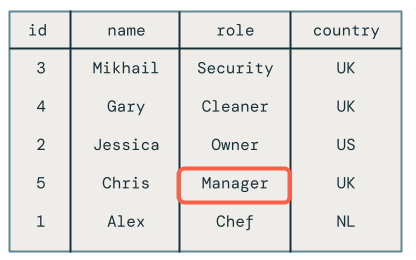
Then, run the following query in the SQL editor to verify that the change records were processed correctly:
SELECT *
FROM mycatalog.myschema.employees_current
Note
The out-of-order update for employee Chris was dropped correctly as their role is still set to Owner instead of Manager.
Step 3: Use SCD Type 2 to keep historical data
In this example, you create a second target table, called employees_historical, that contains a full history of changes to employee records.
Add this code to your pipeline. The only difference here is that stored_as_scd_type is set to 2 instead of 1.
dlt.create_target_table(f"{catalog}.{schema}.{employees_table_historical}")

dlt.apply_changes(
 target=f"{catalog}.{schema}.{employees_table_historical}",
 source=employees_cdf_table,
 keys=["id"],
 sequence_by=col("sequenceNum"),
 apply_as_deletes=expr("operation = 'DELETE'"),
 except_column_list = ["operation", "sequenceNum"],
 stored_as_scd_type = 2
)
Run this pipeline by clicking Start.
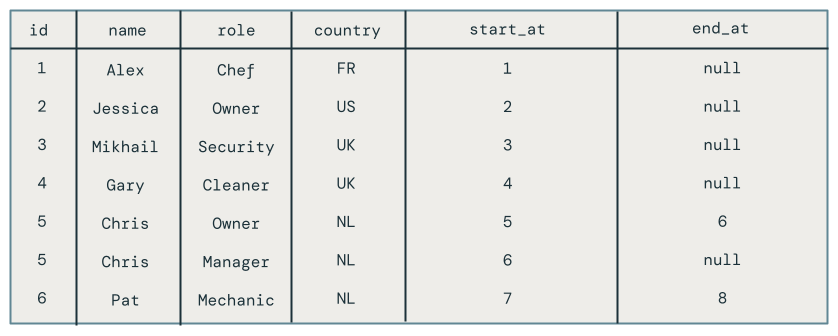
Then, run the following query in the SQL editor to verify that the change records were processed correctly:
SELECT *
FROM mycatalog.myschema.employees_historical
You’ll see all changes to employees, including those employees who were deleted, such as Pat.
Step 4: Clean up resources
When you are done, clean up resources by following these steps:
Delete the pipeline: .. note:: When you delete this pipeline, it automatically deletes the
employeesandemployees_historicaltables. #. Click Pipelines. #. Click the kebab menu and then click Delete.Delete the notebook.
Delete the table that contains the change data feed:
Click New > Query.
Paste and run the following SQL code, adjusting the catalog and schema as appropriate:
DROP TABLE mycatalog.myschema.employees_cdf
Drawbacks of using MERGE INTO and foreachBatch for change data capture
Databricks provides a MERGE INTO SQL command that you can use with the foreachBatch API to upsert rows into a Delta table. This section explores how this technique can be used for simple use cases, but this method becomes increasingly complex and fragile when applied to real-world scenarios.
In this example, you’ll use the same sample change data feed used in the previous examples.
Naive implementation with MERGE INTO and foreachBatch
Create a notebook and copy the following code into it. Change the catalog, schema, and employees_table variables as appropriate. The catalog and schema variables should be set to locations in Unity Catalog where you can create tables.
When you run the notebook, it does the following:
Creates the target table in the
create_table. Unlikeapply_changes, which handles this step automatically, you have to specify the schema.Reads the change data feed as a stream. Each microbatch is processed using the
upsertToDeltamethod, which runs aMERGE INTOcommand.
catalog = "jobs"
schema = "myschema"
employees_cdf_table = "employees_cdf"
employees_table = "employees_merge"


def upsertToDelta(microBatchDF, batchId):
 microBatchDF.createOrReplaceTempView("updates")
 microBatchDF.sparkSession.sql(f"""
   MERGE INTO {catalog}.{schema}.{employees_table} t
   USING updates s
   ON s.id = t.id
   WHEN MATCHED THEN UPDATE SET *
   WHEN NOT MATCHED THEN INSERT *
 """)


def create_table():
 spark.sql(f"DROP TABLE IF EXISTS {catalog}.{schema}.{employees_table}")
  spark.sql(f"""
   CREATE TABLE IF NOT EXISTS {catalog}.{schema}.{employees_table}
   (id INT, name STRING, age INT, country STRING)
 """)


create_table()


cdcData = spark.readStream.table(f"{catalog}.{schema}.{employees_cdf_table}")


cdcData.writeStream \
.foreachBatch(upsertToDelta) \
.outputMode("append") \
.start()
To see the results, run the following SQL query:
SELECT *
FROM mycatalog.myschema.employees_merge
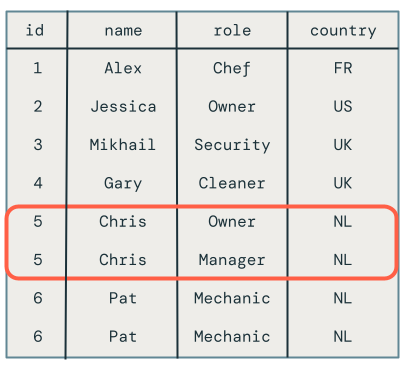
Unfortunately, the results are incorrect, as shown following:
Multiple updates to the same key in the same microbatch
The first problem is that the code doesn’t handle multiple updates to the same key in the same microbatch. For example, you use INSERT to insert the employee Chris and then updated their role from Owner to Manager. This should result in one row, but instead there are two rows.
Which change wins when there are multiple updates to the same key in a microbatch?
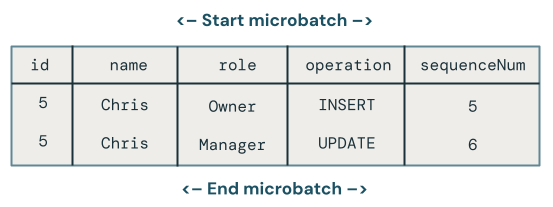
The logic becomes more complex. The following code example retrieves the latest row by sequenceNum and merges only that data into the target table as follows:
Groups by the primary key,
id.Takes all of the columns for the row that has the maximum
sequenceNumin the batch for that key.Explodes the row back out.
Update the upsertToDelta method as shown following and then run the code:
def upsertToDelta(microBatchDF, batchId):
 microBatchDF = microBatchDF.groupBy("id").agg(
   max_by(struct("*"), "sequenceNum").alias("row")
 ).select("row.*").createOrReplaceTempView("updates")


 spark.sql(f"""
   MERGE INTO {catalog}.{schema}.{employees_table} t
   USING updates s
   ON s.id = t.id
   WHEN MATCHED THEN UPDATE SET *
   WHEN NOT MATCHED THEN INSERT *
 """)
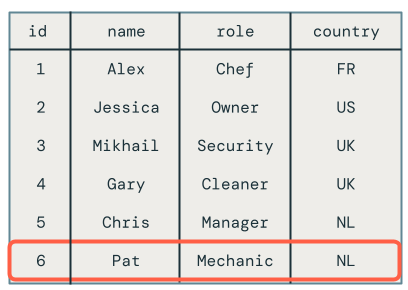
When you query the target table, you see that the employee named Chris has the correct role, but there are still other problems to solve because you still have deleted records showing up in the target table.
Out-of-order updates across microbatches
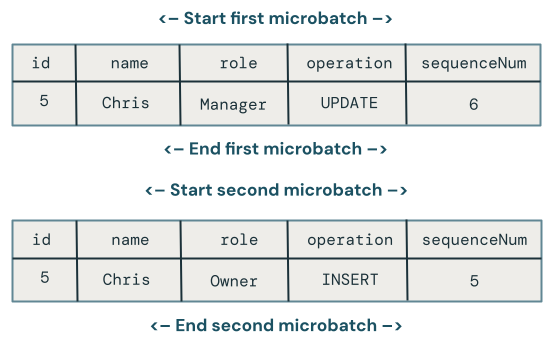
This section explores the problem of out-of-order updates across microbatches. The following diagram illustrates the problem: what if the row for Chris has an UPDATE operation in the first microbatch followed by an INSERT in a subsequent microbatch? The code doesn’t handle this correctly.
Which change wins when there are out-of-order updates to the same key across multiple microbatches?
To fix this, expand the code to store a version in each row as follows:
Store the
sequenceNumwhen a row was last updated.For each new row, check to see if the timestamp is greater than the one stored and then apply the following logic:
If greater, use the new data from the target.
Else, keep the data in the source.
First, update the createTable method to store the sequenceNum since you’ll use it to version each row:
def create_table():
 spark.sql(f"DROP TABLE IF EXISTS {catalog}.{schema}.{employees_table}")
  spark.sql(f"""
   CREATE TABLE IF NOT EXISTS {catalog}.{schema}.{employees_table}
   (id INT, name STRING, age INT, country STRING, sequenceNum INT)
 """)
Next, update upsertToDelta to handle row versions. The UPDATE SET clause of MERGE INTO needs to handle every column separately.
def upsertToDelta(microBatchDF, batchId):
 microBatchDF = microBatchDF.groupBy("id").agg(
   max_by(struct("*"), "sequenceNum").alias("row")
 ).select("row.*").createOrReplaceTempView("updates")


 spark.sql(f"""
   MERGE INTO {catalog}.{schema}.{employees_table} t
   USING updates s
   ON s.id = t.id
   WHEN MATCHED THEN UPDATE SET
     name=CASE WHEN s.sequenceNum > t.sequenceNum THEN s.name ELSE t.name END,
     age=CASE WHEN s.sequenceNum > t.sequenceNum THEN s.age ELSE t.age END,
     country=CASE WHEN s.sequenceNum > t.sequenceNum THEN s.country ELSE t.country END
   WHEN NOT MATCHED THEN INSERT *
 """)
Handling deletes
Unfortunately, the code still has a problem. It does not handle DELETE operations, as evidenced by the fact that employee Pat is still in the target table.
Let’s assume that deletes arrive in the same microbatch. To handle them, update the upsertToDelta method again to delete the row when the change data record indicates deletion as shown following:
def upsertToDelta(microBatchDF, batchId):
 microBatchDF = microBatchDF.groupBy("id").agg(
   max_by(struct("*"), "sequenceNum").alias("row")
 ).select("row.*").createOrReplaceTempView("updates")


 spark.sql(f"""
   MERGE INTO {catalog}.{schema}.{employees_table} t
   USING updates s
   ON s.id = t.id
   WHEN MATCHED AND s.operation = 'DELETE' THEN DELETE
   WHEN MATCHED THEN UPDATE SET
     name=CASE WHEN s.sequenceNum > t.sequenceNum THEN s.name ELSE t.name END,
     age=CASE WHEN s.sequenceNum > t.sequenceNum THEN s.age ELSE t.age END,
     country=CASE WHEN s.sequenceNum > t.sequenceNum THEN s.country ELSE t.country END
   WHEN NOT MATCHED THEN INSERT *
 """)
Handling updates arriving out-of-order after deletes
Unfortunately, the code above still isn’t quite correct because it doesn’t handle cases when a DELETE is followed by an out-of-order UPDATE across microbatches.
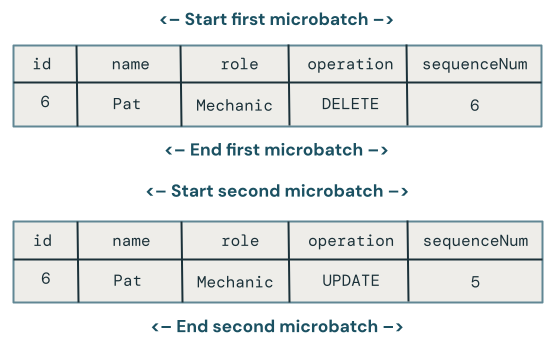
The algorithm to handle this case needs to remember deletes so that it can handle subsequent out-of-order updates. To do this:
Instead of deleting rows immediately, soft delete them with a timestamp or
sequenceNum. Soft-deleted rows are tombstoned.Redirect all of your users to a view that filters out tombstones.
Build a cleanup job that removes the tombstones over time.
Use the following code:
def upsertToDelta(microBatchDF, batchId):
 microBatchDF = microBatchDF.groupBy("id").agg(
   max_by(struct("*"), "sequenceNum").alias("row")
 ).select("row.*").createOrReplaceTempView("updates")


 spark.sql(f"""
   MERGE INTO {catalog}.{schema}.{employees_table} t
   USING updates s
   ON s.id = t.id
   WHEN MATCHED AND s.operation = 'DELETE' THEN UPDATE SET DELETED_AT=now()
   WHEN MATCHED THEN UPDATE SET
     name=CASE WHEN s.sequenceNum > t.sequenceNum THEN s.name ELSE t.name END,
     age=CASE WHEN s.sequenceNum > t.sequenceNum THEN s.age ELSE t.age END,
     country=CASE WHEN s.sequenceNum > t.sequenceNum THEN s.country ELSE t.country END
   WHEN NOT MATCHED THEN INSERT *
 """)
Your users can’t use the target table directly, so create a view that they can query:
CREATE VIEW employees_v AS
SELECT * FROM employees_merge
WHERE DELETED_AT = NULL
Finally, create a cleanup job that periodically removes tombstoned rows:
DELETE FROM employees_merge
WHERE DELETED_AT < now() - INTERVAL 1 DAY