Databricks widgets
Input widgets allow you to add parameters to your notebooks and dashboards. You can add a widget from the Databricks UI or using the widget API. To add or edit a widget, you must have CAN EDIT permissions on the notebook.
If you are running Databricks Runtime 11.3 LTS or above, you can also use ipywidgets in Databricks notebooks.
Databricks widgets are best for:
Building a notebook or dashboard that is re-executed with different parameters.
Quickly exploring results of a single query with different parameters.
To view the documentation for the widget API in Scala, Python, or R, use the following command: dbutils.widgets.help(). You can also refer to the widgets utility (dbutils.widgets) documentation.
Databricks widget types
There are 4 types of widgets:
text: Input a value in a text box.dropdown: Select a value from a list of provided values.combobox: Combination of text and dropdown. Select a value from a provided list or input one in the text box.multiselect: Select one or more values from a list of provided values.
Widget dropdowns and text boxes appear immediately following the notebook toolbar. Widgets only accept string values.

Create widgets
This section shows you how to create widgets using the UI or programatically using either SQL magics or the widget API for Python, Scala, and R.
Create widgets using the UI
Create a widget using the notebook UI. If you are connected to a SQL warehouse, this is the only way you can create widgets.
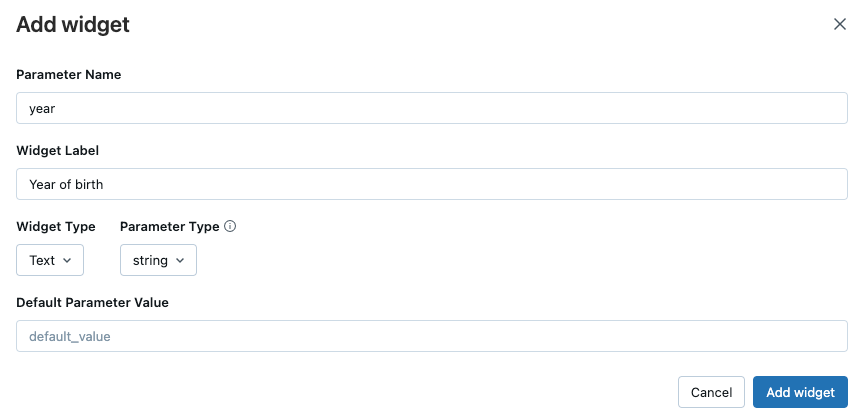
Select Edit > Add widget. In the Add widget dialog, enter the widget name, optional label, type, parameter type, possible values, and optional default value. In the dialog, Parameter Name is the name you use to reference the widget in your code. Widget Label is an optional name that appears over the widget in the UI.
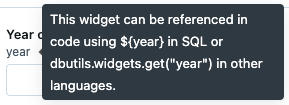
After you’ve created a widget, you can hover over the widget name to display a tooltip that describes how to reference the widget.
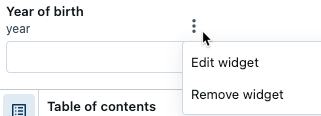
You can use the kebab menu to edit or remove the widget:
Create widgets with SQL, Python, R, and Scala
Programmatically create widgets in a notebook attached to a compute cluster.
The widget API is designed to be consistent in Scala, Python, and R. The widget API in SQL is slightly different but equivalent to the other languages. You manage widgets through the Databricks Utilities (dbutils) reference interface.
The first argument for all widget types is
name. This is the name you use to access the widget.The second argument is
defaultValue, the widget’s default setting.The third argument for all widget types (except
text) ischoices, a list of values the widget can take on. This argument is not used fortexttype widgets.The last argument is
label, an optional value for the label shown over the widget text box or dropdown.
dbutils.widgets.dropdown("state", "CA", ["CA", "IL", "MI", "NY", "OR", "VA"])
dbutils.widgets.dropdown("state", "CA", ["CA", "IL", "MI", "NY", "OR", "VA"])
dbutils.widgets.dropdown("state", "CA", ["CA", "IL", "MI", "NY", "OR", "VA"])
CREATE WIDGET DROPDOWN state DEFAULT "CA" CHOICES SELECT * FROM (VALUES ("CA"), ("IL"), ("MI"), ("NY"), ("OR"), ("VA"))
Interact with the widget from the widget panel.

You can access the current value of the widget or get a mapping of all widgets:
dbutils.widgets.get("state")

dbutils.widgets.getAll()
dbutils.widgets.get("state")

dbutils.widgets.getAll()
dbutils.widgets.get("state")
SELECT :state
Finally, you can remove a widget or all widgets in a notebook:
dbutils.widgets.remove("state")

dbutils.widgets.removeAll()
dbutils.widgets.remove("state")

dbutils.widgets.removeAll()
dbutils.widgets.remove("state")

dbutils.widgets.removeAll()
REMOVE WIDGET state
If you remove a widget, you cannot create one in the same cell. You must create the widget in another cell.
Use widget values in Spark SQL and SQL Warehouse
Spark SQL and SQL Warehouse access widget values using parameter markers. Parameter markers protect your code from SQL injection attacks by clearly separating provided values from the SQL statements.
Parameter markers for widgets is available in Databricks Runtime 15.2 and above. Previous versions of Databricks Runtime should use the old syntax for DBR 15.1 and below.
You can access widgets defined in any language from Spark SQL while executing notebooks interactively. Consider the following workflow:
Create a dropdown widget of all databases in the current catalog:
dbutils.widgets.dropdown("database", "default", [database[0] for database in spark.catalog.listDatabases()])
Create a text widget to manually specify a table name:
dbutils.widgets.text("table", "")
Run a SQL query to see all tables in a database (selected from the dropdown list):
SHOW TABLES IN IDENTIFIER(:database)
Note
You must use the SQL
IDENTIFIER()clause to parse strings as object identifiers such names for databases, tables, views, functions, columns, and fields.Manually enter a table name into the
tablewidget.Create a text widget to specify a filter value:
dbutils.widgets.text("filter_value", "")
Preview the contents of a table without needing to edit the contents of the query:
SELECT *
FROM IDENTIFIER(:database || '.' || :table)
WHERE col == :filter_value
LIMIT 100
Use widget values in Databricks Runtime 15.1 and below
This section describes how to pass Databricks widgets values to %sql notebook cells in Databricks Runtime 15.1 and below.
Create widgets to specify text values.
 dbutils.widgets.text("database", "")
 dbutils.widgets.text("table", "")
 dbutils.widgets.text("filter_value", "100")
 dbutils.widgets.text("database", "")
 dbutils.widgets.text("table", "")
 dbutils.widgets.text("filter_value", "100")
 dbutils.widgets.text("database", "")
 dbutils.widgets.text("table", "")
 dbutils.widgets.text("filter_value", "100")
 CREATE WIDGET TEXT database DEFAULT ""
 CREATE WIDGET TEXT table DEFAULT ""
 CREATE WIDGET TEXT filter_value DEFAULT "100"
Pass in the widget values using the
${param}syntax.SELECT * FROM ${database}.${table} WHERE col == ${filter_value} LIMIT 100
Note
To escape the $ character in a SQL string literal, use \$. For example, to express the string $1,000, use "\$1,000". The $ character cannot be escaped for SQL identifiers.
Configure widget settings
You can configure the behavior of widgets when a new value is selected, whether the widget panel is always pinned to the top of the notebook, and change the layout of widgets in the notebook.
Click the
 icon at the right end of the Widget panel.
In the pop-up Widget Panel Settings dialog box, choose the widget’s execution behavior.
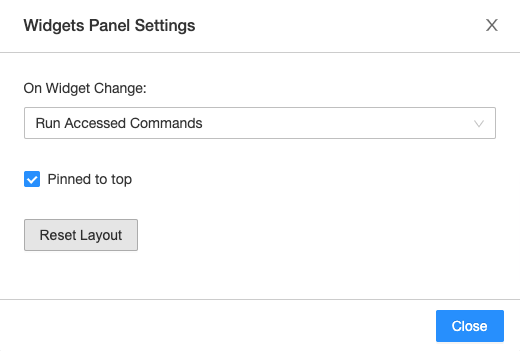
Run Notebook: Every time a new value is selected, the entire notebook is rerun.
Run Accessed Commands: Every time a new value is selected, only cells that retrieve the values for that particular widget are rerun. This is the default setting when you create a widget. SQL cells are not rerun in this configuration.
Do Nothing: Every time a new value is selected, nothing is rerun.
To pin the widgets to the top of the notebook or to place the widgets above the first cell, click
 . The setting is saved on a per-user basis. Click the thumbtack icon again to reset to the default behavior.
If you have CAN MANAGE permission for notebooks, you can configure the widget layout by clicking
 . Each widget’s order and size can be customized. To save or dismiss your changes, click
  .
.The widget layout is saved with the notebook. If you change the widget layout from the default configuration, new widgets are not added alphabetically.
To reset the widget layout to a default order and size, click
to open the Widget Panel Settings dialog and then click Reset Layout. The removeAll()command does not reset the widget layout.
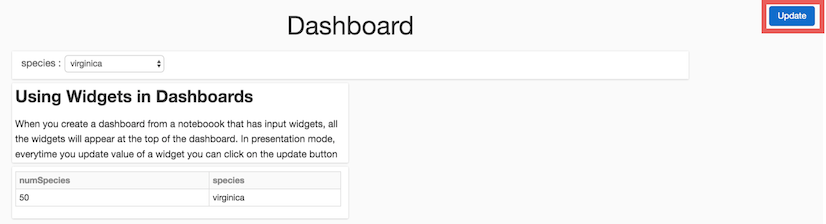
Databricks widgets in dashboards
When you create a dashboard from a notebook with input widgets, all the widgets display at the top. In presentation mode, every time you update the value of a widget, you can click the Update button to re-run the notebook and update your dashboard with new values.
Use Databricks widgets with %run
If you run a notebook that contains widgets, the specified notebook is run with the widget’s default values.
If the notebook is attached to a cluster (not a SQL warehouse), you can also pass values to widgets. For example:
%run /path/to/notebook $X="10" $Y="1"
This example runs the specified notebook and passes 10 into widget X and 1 into widget Y.