Configure a customer-managed VPC
Important
This feature requires that your account is on the Premium plan.
Overview
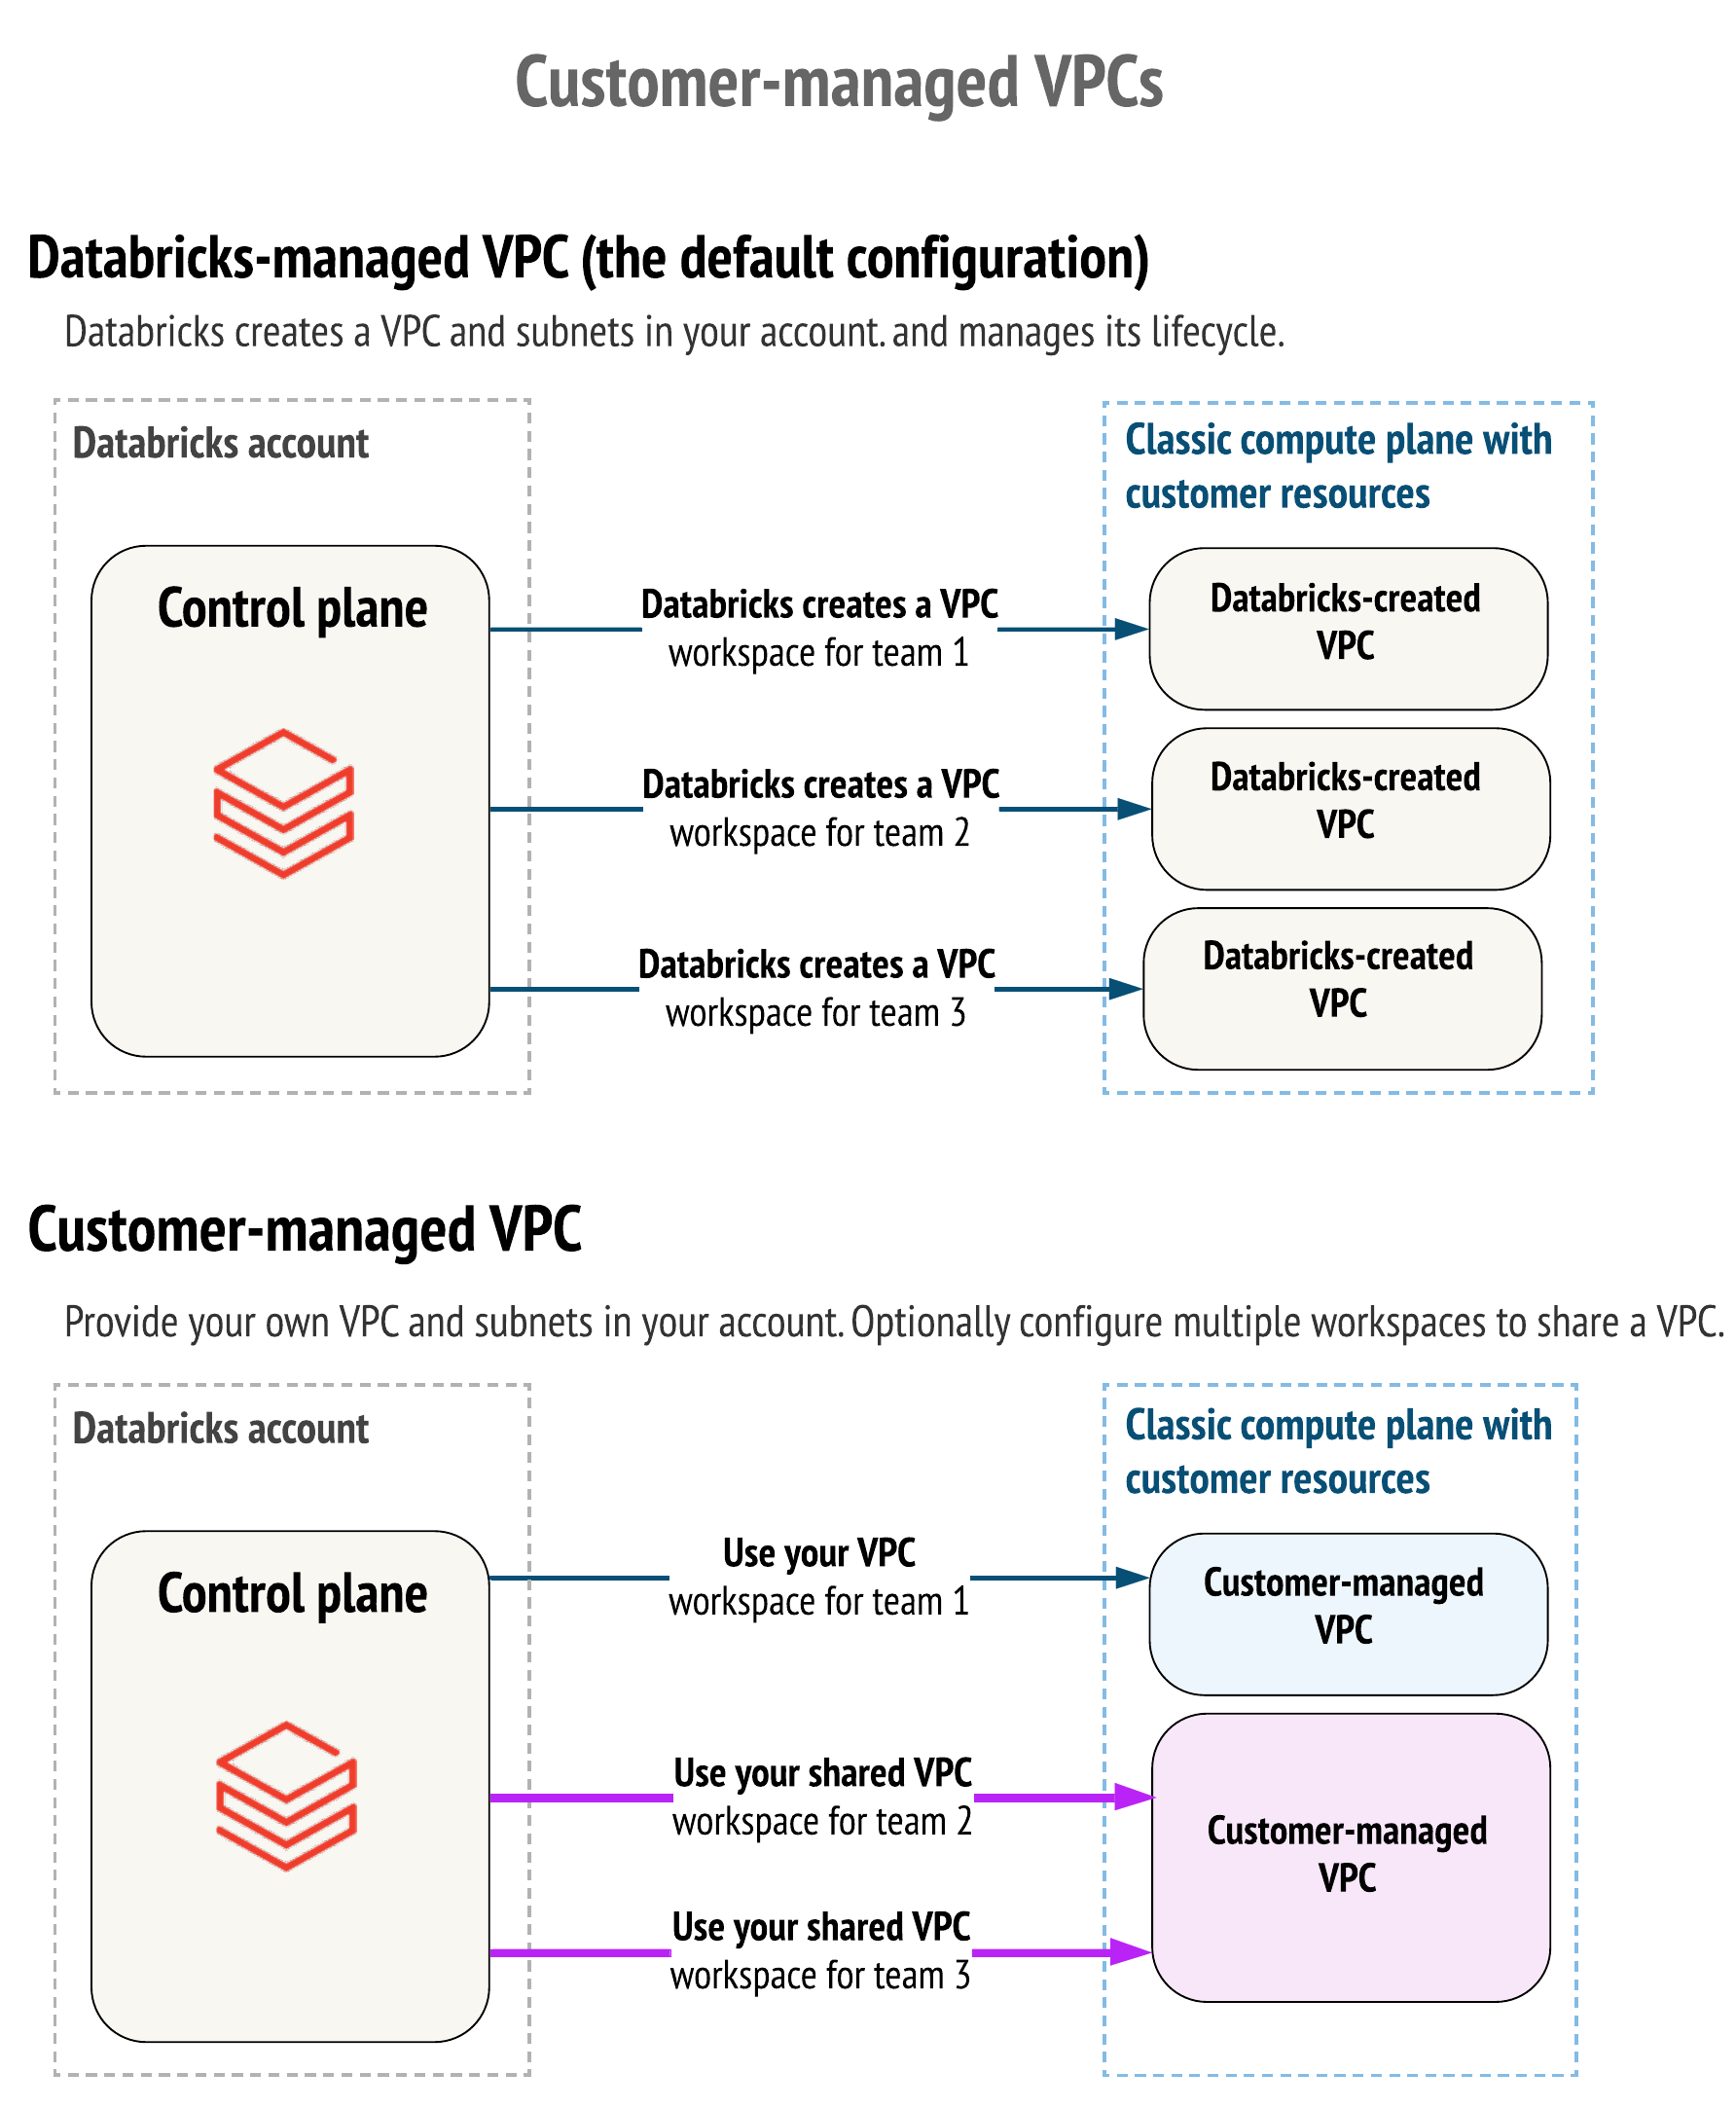
By default, your Databricks workspace classic compute resources such as Databricks Runtime clusters are created within a GKE cluster within a Google Cloud Virtual Private Cloud (VPC) network. Databricks creates and configures this VPC in your Google Cloud account.
Alternatively, you can choose to create your Databricks workspaces in an existing customer-managed VPC that you create in your Google Cloud account. You can use a customer-managed VPC to exercise more control over your network configurations to comply with specific cloud security and governance standards that your organization may require. To configure your workspace to use Private Service Connect for any type of connection, your workspace must use a customer-managed VPC.
A customer-managed VPC is good solution if you have:
Security policies that prevent PaaS providers from creating VPCs in your own Google Cloud account.
An approval process to create a new VPC, in which the VPC is configured and secured in a well-documented way by internal information security or cloud engineering teams.
Benefits include:
Lower privilege levels: Maintain more control of your own Google Cloud account. Databricks does not need as many permissions as needed for the default Databricks-managed VPC. Limited required permissions can make it easier to get approval to use Databricks in your platform stack. See Lower privilege level for customer-managed VPCs.
Consolidated VPCs: Configure multiple Databricks workspaces to share a single compute plane VPC. This is often preferred for billing and instance management.
To use a customer-managed VPC, you must specify it when you create the Databricks workspace through the account console. You cannot move an existing workspace with a Databricks-managed VPC to your own VPC. Also, after workspace creation you cannot change which customer-managed VPC that the workspace uses.
Lower privilege level for customer-managed VPCs
While creating a workspace, Databricks creates a service account and grants a role with permissions that Databricks needs to manage your workspace.
If your workspace uses a customer-managed VPC, it does not need as many permissions. The role that Databricks creates omits permissions such as creating, updating, and deleting objects such as networks, routers, and subnets. For the full list, see Required permissions for the workspace service account.
Requirements
Egress requirements
As part of creating a workspace, Databricks creates a GKE cluster in the VPC. By default, this is a private GKE cluster, which means that there are no public IP addresses. For a private GKE cluster, the subnet and secondary IP ranges that you provide must allow outbound public internet traffic, which they are not allowed to do by default. To enable egress, you can add a Google Cloud NAT or use a similar approach. See Step 1: Create and set up your VPC. If you configure IP access lists, those public IP addresses must be added to an allow list. See Configure IP access lists for workspaces.
Note
If you choose a public GKE cluster instead, your workspace does not have secure cluster connectivity because compute nodes have public IP addresses.
Network requirements
The following table lists requirements for network resources and attributes using CIDR notation.
Network resource or attribute |
Description |
Valid range |
|---|---|---|
Subnet range |
Your VPC’s IP range from which to allocate your workspace’s GKE cluster nodes. For sizing recommendations and calculations, see Calculate subnet sizes for a new workspace. |
The range from |
Subnet region |
Region of the subnet |
The subnet region must match the region of your workspace for Databricks to provision a GKE cluster to run your workspace. |
Secondary range for GKE pods |
Your VPC’s IP range from which to allocate your workspace’s GKE cluster pods. |
The range from |
Secondary range for GKE Services |
Your VPC’s IP range from which to allocate your workspace’s GKE cluster services. |
The range from |
Sharing one VPC with multiple workspaces
You can use one Google Cloud VPC with multiple workspaces. You must ensure that the subnets for each workspace do not overlap. To use separate Google Cloud projects for each workspace, separate from the VPC’s project, use what Google calls a Shared VPC. For details, see Project requirements.
Project requirements
The Google Cloud project associated with your VPC can match the workspace’s project, but it is not required to match.
If you use a standard VPC, which Google calls a standalone VPC, Databricks uses the same Google Cloud project for both of the following:
Your VPC network
Resources that Databricks creates for each workspace for compute and storage resources. Compute resources include the GKE cluster and its cluster nodes. Storage resources include the two GCS buckets for system data and DBFS root.
If you want your VPC to have a different Google Cloud project from the compute and storage resources, you must create what Google calls a Shared VPC instead of a standalone VPC. A Shared VPC allows you to connect resources from multiple projects to a common VPC network to communicate with each other using internal IPs from that network.
Note
Terminology notes:
Do not confuse the term Shared VPC with whether multiple workspaces share a VPC. Both standalone VPCs and Shared VPCs can be used with either a single Databricks workspace or multiple workspaces.
A Shared VPC is also known as a Cross Project Network or XPN. Databricks documentation uses the term Shared VPC to follow the most common usage in Google documentation.
You may want to use a different project for workspace resources for various reasons:
You want to separate billing metadata for each workspace for cost attribution and budget calculations for each business unit that has its own Databricks workspace but a single VPC that hosts all the workspaces.
You want to limit permissions on each project for each purpose. For example, the project that you use for each workspace’s compute and storage resources does not need permission to create a VPC.
Your organization might require this approach for Google Cloud applications.
What Google calls the host project is the project for your VPC. What Google calls the service project is the project that Databricks uses for each workspace’s compute and storage resources.
Role requirements
The principal that performs an operation must have specific required roles for each operation.
Important
The principal that needs specific roles on the project depends on how you perform the operation.
To use the account console, the principal is your admin user account.
To use the Account API, the principal is the main service account (SA-2) for OIDC authentication. Remember that a service account does not automatically inherit roles from you as its creator. You must add roles for the service account on the project.
For a standalone VPC account, there is one Google Cloud project for both the VPC and resources deployed in it. If your VPC is what Google calls a Shared VPC, it means that the VPC has a separate project from the project used for each workspace’s compute and storage resources. For a Shared VPC, the entity that performs the operation (the user or the service account) must have specific roles on both the VPC’s project and the workspace’s project. See the following table for details. For details about Shared VPCs, see Project requirements.
To create a workspace with a customer-managed VPC, you need the roles for creating both a network configuration and a workspace. The following table shows roles that must be granted to the workspace creator on the GCP project where the workspace will be provisioned and the GCP project where the VPC resides (if this project is different than the workspace project):
Operation |
Required roles on GCP project(s) where the VPC and/or workspace resides |
|---|---|
Perform all the customer-managed VPC operations listed below |
Either Owner ( |
Create network configuration |
Viewer ( |
Delete network configuration |
None |
Create a Databricks workspace |
Owner ( |
Delete a workspace |
Either Owner ( |
Step 1: Create and set up your VPC
Decide whether you want to create what Google calls a standalone VPC or a Shared VPC. A Shared VPC allows you to specify one Google Cloud project for the VPC and separate projects for each workspace. Databricks uses the workspace project to create the workspace’s storage and compute resources. See Project requirements.
To use the same project for your VPC as for each workspace’s compute and storage resources, create a standalone VPC.
Otherwise, create a Shared VPC.
Create a VPC according to the network requirements:
To create a standalone VPC, use either the Google Cloud console or the Google CLI. To use the Google CLI to create a standalone VPC with IP ranges that are sufficient for a Databricks workspace, run the following commands. Replace
<region>with the Google Cloud region in which you plan to create your Databricks workspace. Replace<vpc-name>with a new VPC name. Replace<subnet-name>with a new subnet name. Replace<project-id>with the project ID of the standalone VPC.gcloud config set project <project-id> gcloud compute networks create <vpc-name> --subnet-mode=custom gcloud compute networks subnets create <subnet-name> \ --network=<vpc-name> --range=10.0.0.0/16 --region=<region> \ --secondary-range pod=10.1.0.0/16,svc=10.2.0.0/20
In this example, the secondary IP ranges are named
podandsvc. These names are relevant for later configuration steps.To create a Shared VPC:
Read the Google article “Shared VPC Overview””.
Follow instructions in the Google article “Setting up clusters with Shared VPC”. The host project is the project for your VPC. The service project is the project that Databricks uses for each workspace’s compute and storage resources. That page provides instructions to set up a Shared VPC, create a GKE test cluster in the Shared VPC for testing, and delete your test cluster.
If you plan to use a private GKE cluster for any workspace in this VPC, which is the default setting during workspace creation, the compute resource nodes have no public IP addresses.
Note
If you plan to use a public GKE cluster during workspace creation, which creates public IP addresses for compute resource nodes, skip to the next step within this section.
To support workspaces with a private GKE cluster, a VPC must include resources that allow egress (outbound) traffic from your VPC to the public internet so that your workspace can connect to the Databricks control plane.
A simple approach to enable egress is to add a Google Cloud NAT. Follow the instructions in the Google article “Set up network address translation with Cloud NAT”. This approach enables egress to all destinations. If you want to limit egress to only the required destinations, you can do so now or later using the instructions in Limit network egress for your workspace using a firewall.
If you use the Google CLI for this step, you can do so with the following commands. Replace
<vpc-name>with your VPC name as specified in earlier steps. Replace<nat-name>with the new NAT name. Replace<region>with the region name that you intend to use with your workspace (or multiple workspaces in the same region) :gcloud compute routers create my-router --network=<vpc-name> --region=<region> gcloud compute routers nats create <nat-name> \ --router=my-router \ --auto-allocate-nat-external-ips \ --nat-all-subnet-ip-ranges \ --router-region=<region>
For additional examples, see the Google article “Example GKE setup”.
Step 2: Confirm or add roles on projects for your admin user account
The principal that performs an operation must have specific required roles for each operation. See Role requirements for the roles needed for creating a workspace and other related operations
Important
The principal that needs specific roles on the project depends on how you perform the operation.
To use the account console, the principal is your admin user account.
To use the Account API, the principal is the main service account (SA-2) for OIDC authentication. Remember that a service account does not automatically inherit roles from you as its creator. You must add roles for the service account on the project.
To confirm or update roles for the principal on a project:
Go to the project IAM page in Google Cloud console.
If needed, change the project from the project picker at the top of the page to match your VPC’s project.
If the principal already has roles on this project, you can find it on this page and review its roles in the Role column.
To add new roles to a principal on this project:
At the top of the IAM page, click ADD.
In the Principal field, type the email address of the entity to update.
Click the Select a role field. Choose a required role that is listed as required. See Role requirements. For the roles Owner, Viewer, and Editor, you can find them within the picker in the Basic category.
Note
To create a workspace with a customer-managed VPC, you need the roles for creating both a network configuration and a workspace. Add roles for both operations now.
To add other roles, click ADD ANOTHER ROLE and repeat the previous steps in “To confirm or update roles for the principal on a project”.
Click SAVE.
If you use a Google Cloud Shared VPC, which allows a different Google Cloud project for your workspace resources such as compute resources and storage, you also need to confirm or add roles for the principal on the workspace’s project. Repeat the steps in this section but use the workspace’s project instead of the VPC’s project.
Step 3: Register your network with Databricks, which creates a network configuration object
Register your network (VPC) as a new Databricks network configuration object.
Go to the account console.
In the left navigation, click Cloud Resources
 .
.Click Add network configuration.
In a separate web browser window, open the Google Cloud Console.
Navigate to your VPC.
Click on your subnet name. The Google Cloud console displays a page with subnet details and other information that you need for the form.
Copy information into the Add network configuration form.
Enter a human-readable name for the network configuration in the first field.
Enter the correct values for your VPC name, subnet name, and region of the subnet.
Enter the secondary IP ranges for GKE pods and services. If you used the earlier example to create the standalone VPC with the
gcloudCLI command, these secondary IP ranges are namedpodandsvc.Click Add.
Step 4: Create a Databricks workspace that references your network configuration
Important
To create a workspace, you must have some required Google permissions on your account, which can be a Google Account or a service account. See Required permissions.
To create a workspace using the account console, follow the instructions in Create a workspace using the account console and set these fields:
For Google cloud project ID:
If your VPC is a standalone VPC, set this to the project ID for your VPC. For a standalone VPC, this is also the project that your workspace uses for its resources.
If your VPC is a Shared VPC, set this to the project ID for this workspace’s resources.
For Network Mode, select Customer-managed network.
For Network configuration, select your network configuration from the picker.
Step 5: Add firewall rule to allow compute deployment
To allow Databricks to deploy GCE compute resources in your account, Databricks attempts to add a firewall rule to your VPC automatically. To prevent the attempt from failing due to lack of privileges, you must add the following firewall rule to your VPC. This firewall rule permits traffic between Databricks-managed VMs within your VPC. The rule does not permit ingress from outside the VPC.
The required rule should be:
Rule name:
databricks-{WORKSPACE_ID}-ingressDirection: Ingress
Priority: 1000
Targets:
Network tag: databricks-{WORKSPACE_ID}Source filter:
IPv4 range: primary CIDR range of subnetProtocols and ports: Allow all