Limit network egress for your workspace using a firewall
By default Google Cloud allows all egress traffic from your VPC. Optionally, you can choose to configure your workspace to limit egress to only the essential services and destinations that your organization requires. To allow the essential services, you need to modify the Google Cloud network (VPC) and the firewall that Databricks creates for your workspace. For some services, you can set up Private Google Access to communicate with Google APIs over private IP addresses.
For the latest updates on how these Google Cloud features work, refer to the Google Cloud documentation.
If you want to configure a corporate domain name firewall to connect to the Databricks web application, instead see Configure domain name firewall rules.
For a general overview of Databricks architecture including the definitions of classic compute plane and control plane, see Databricks architecture overview.
Firewall configuration overview
If you want to limit egress from the classic compute plane, you must make two general types of configuration to allow required connections that would otherwise be blocked:
Private Google Access for GCR and GCS: By default, when a Compute Engine virtual machine (VM) such as a Databricks cluster node lacks an external (public) IP address that is assigned to its network interface, it can send packets only to other internal IP address destinations. You can allow these VMs to connect to the set of external IP addresses used by Google APIs and services by enabling Private Google Access (PGA) on the subnet that the VM’s network interface uses. WIth PGA, direct communication between the Databricks compute plane and these Google services use Google’s internal network rather than the public internet. This affects the following outgoing connections from the compute plane:
The classic compute plane uses Google Container Registry (GCR) to get Databricks runtime images.
The classic compute plane uses Google Cloud Storage (GCS) to write to workspace health check logs and usage logs.
Firewall rules for control plane services: After you block egress by modifying the built-in firewall, you must allow several essential services by adding new firewall rules:
The egress to the web application and REST APIs on port 443.
The egress to the secure cluster connectivity relay on port 443.
The egress to the default Hive metastore on port 3306. If you deploy your own external metastore, you do not need to add network rules for the unused default metastore.
The egress for internal calls from the Databricks compute plane to the Databricks control plane API on port 8443.
The egress for Unity Catalog logging and lineage data streaming into Databricks on port 8444.
The egress on ports 8445-8451 to support upcoming features.
The IP address ranges for the web application, secure cluster connectivity relay, and the default Hive metastore vary by region. For the values for your region, see the table in IP addresses and domains for Databricks services and assets.
This article includes examples of Google Cloud configuration using the gcloud command line interface (CLI). To use these examples, you must install the Google Cloud SDK.
Control plane service endpoint IP addresses by region
If you want to configure a firewall to block egress, you must define new VPC egress firewall rules and routes to allow essential services that are hosted in the Databricks control plane. Endpoint IP addresses vary by the Google Cloud region of your Databricks workspace. Use the table in IP addresses and domains for Databricks services and assets to get the port and IP address of the control plane ingresses for your workspace’s Google Cloud region.
Step 1: Plan your network sizing
If you plan to use large clusters or many workspaces, ensure that your workspaces will have sufficient IP space to run Databricks jobs by calculating your GKE subnet ranges by using the network sizing calculator.
Configure the GKE subnets used by your Databricks workspace accurately because you cannot change them after your workspace is deployed. If the address ranges for your Databricks subnets are too small, then the workspace exhausts its IP space, which in turn causes your Databricks jobs to fail. To determine the address range sizes that you need, Databricks provides a calculator in the form of a Microsoft Excel spreadsheet. See Calculate subnet sizes for a new workspace.
Step 2: Create a workspace
Log into the account console
Create a new Databricks workspace.
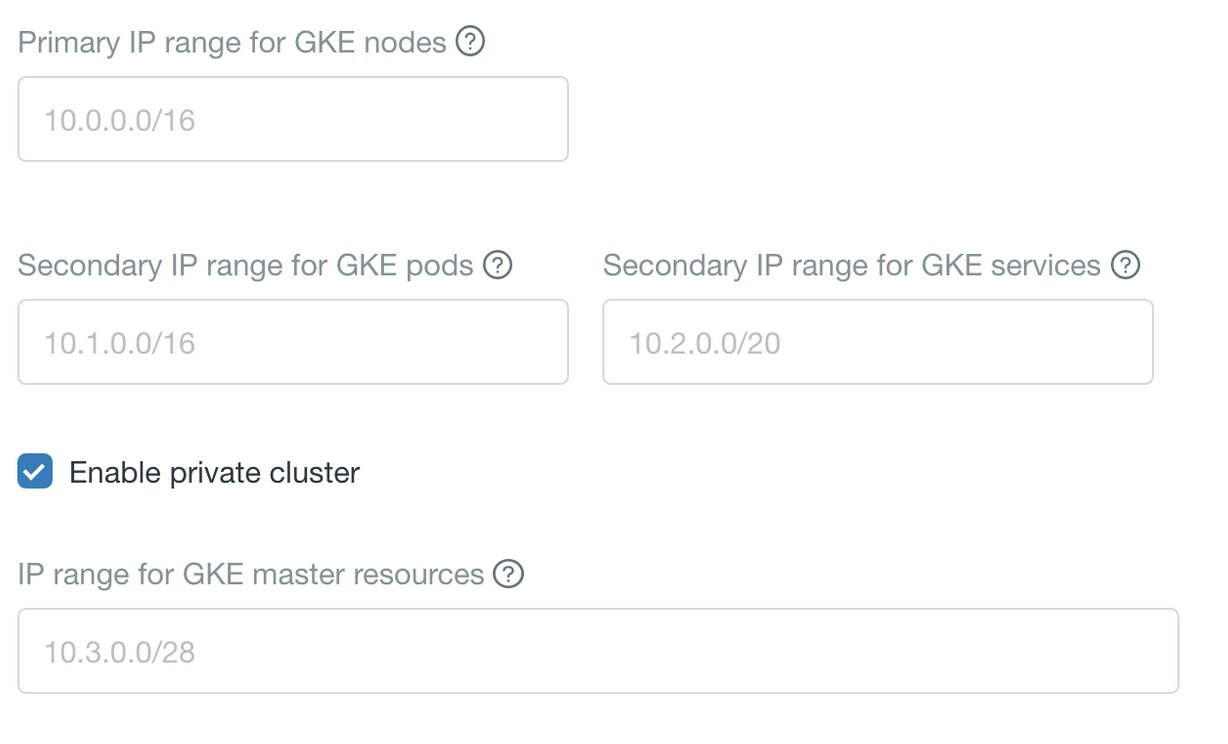
In the Advanced Configuration section of the form to create the workspace, you must use the default settings for Enable private cluster, which causes the workspace to use a private GKE cluster. For a private GKE cluster, Databricks compute instances have no public IP addresses.
Write down all IP subnet settings that appear in the Advanced Configuration section during workspace creation. There are defaults but you can override them. For details see Create a workspace using the account console.
Ensure the Databricks VPC and subnets in your Google account have Private Google Access (PGA) enabled.
Step 3: Add VPC firewall rules
You must now add firewall rules to the firewall that Databricks created for your new workspace.
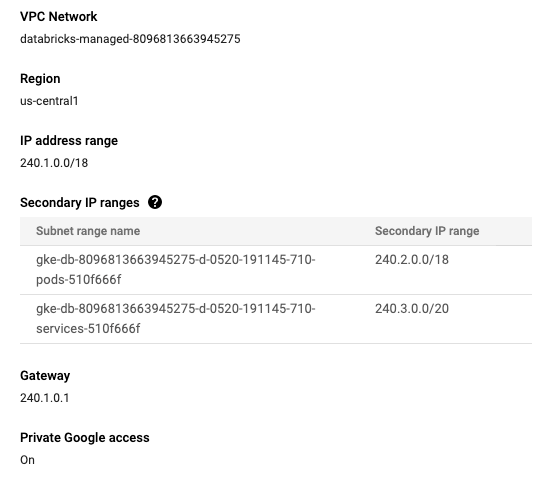
Get your VPC name. Databricks created this VPC in your Google account as part of workspace creation.
From the account console workspace page, click on your workspace to launch it.
Copy the numeric part of the URL after
?o=. For example, if the workspace URL ishttps://1676665108650415.5.gcp.databricks.com/?o=1676665108650415#, the workspace ID is 1676665108650415.The VPC for your workspace has the name
databricks-managed-<workspace-ID>. For example,databricks-managed-1676665108650415. Write down this value so you can use it with CLI commands.
If you want to use the Google Console to add firewall rules:
Go to the VPCs page on Google Cloud console.
Click on the VPC name for the network that matches your workspace’s VPC name.
Click on the FIREWALL RULES tab.
Add a rule to block egress to
0.0.0.0/0, which is a special syntax that means all external IP addresses.By default, Google Cloud allows all egress traffic from your VPC. You need to create a rule blocking this traffic. Ensure that the priority for this rule is set to a large number. The purpose is for this rule to apply after Google Cloud runs all of other rules. For example you could set this rule to priority 1100 and then later you set your egress rule priorities in the range of 1000-1099.
Important
If you incorrectly use a low priority value for this rule, Google Cloud denies network traffic to essential Databricks and GKE services, which would render your workspace unusable.
Because of this rule, any traffic going to internal IP space (10.0.0.0/8, 172.16.0.0/20, 192.168.0.0/16) need an additional egress rule to allow the cluster to reach those IP addresses.
You can use the following
gcloudCLI command to create this rule. Replace<vpc-name>with your VPC name.gcloud compute firewall-rules create deny-egress --action DENY --rules all --destination-ranges 0.0.0.0/0 --direction EGRESS --priority 1100 --network <vpc-name>
Add a rule to allow ingress from Google health checks.
You can use the following
gcloudCLI command to create this rule. Replace<vpc-name>with your VPC name.gcloud compute firewall-rules create from-gcp-healthcheck \ --action ALLOW \ --rules tcp:80,tcp:443 \ --source-ranges 130.211.0.0/22,35.191.0.0/16 \ --direction INGRESS \ --priority 1010 \ --network <vpc-name>
Add a rule to allow egress to Google health checks.
You can use the following
gcloudCLI command to create this rule. Replace<vpc-name>with your VPC name.gcloud compute firewall-rules create to-gcp-healthcheck \ --action ALLOW \ --rules tcp:80,tcp:443 \ --destination-ranges 130.211.0.0/22,35.191.0.0/16 \ --direction EGRESS \ --priority 1000 \ --network <vpc-name>
Add a rule to allow egress to restricted APIs (restricted.googleapis.com), which is required to reach the GKE API at a fixed IP address range.
You can use the following
gcloudCLI command to create this rule. Replace<vpc-name>with your VPC name.gcloud compute firewall-rules create to-google-apis \ --action ALLOW \ --rules all \ --destination-ranges 199.36.153.4/30 \ --direction EGRESS \ --priority 1000 \ --network <vpc-name>
Add a rule to allow egress to the IP range for GKE master resources. There is a default GKE master IP range, but you can override the values during workspace creation. See Create a workspace using the account console.
You can use the following
gcloudCLI command to create this rule. Replace<vpc-name>with your VPC name. ReplaceX.X.X.X/28with your IP range for GKE master resources.gcloud compute firewall-rules create to-gke-master \ --action ALLOW \ --rules tcp:443,tcp:10250 \ --destination-ranges X.X.X.X/28 \ --direction EGRESS \ --priority 1000 \ --network <vpc-name>
Add a rule to allow intra-subnet communication (egress) used by the Databricks workspace. There are defaults for these subnets that are visible during workspace creation in the Advanced Configuration section. You need to allow egress to all three of the subnet ranges that are labelled in the user interface as Primary IP range for GKE nodes, Secondary IP range for GKE pods, and Secondary IP range for GKE services.
You can use the following
gcloudCLI command to create this rule. Replace<vpc-name>with your VPC name. ReplaceX.X.X.X/X,X.X.X.X/X,X.X.X.X/Xwith your three Databricks subnets that you provided during workspace creation.gcloud compute firewall-rules create to-gke-nodes-subnet \ --action ALLOW \ --rules all \ --destination-ranges X.X.X.X/X,X.X.X.X/X,X.X.X.X/X \ --direction EGRESS \ --priority 1000 \ --network <vpc-name>
Add a rule to allow egress to Databricks control plane services. Use the table in IP addresses and domains for Databricks services and assets to determine the correct values for each supported Databricks region for these services.
Allow connections to the main web application and the secure cluster connectivity (SCC) relay on port 443. Use the following
gcloudCLI command to create this rule. Replace<vpc-name>with your VPC name. ReplaceX.X.X.Xwith your regional ingress address for the web application. ReplaceY.Y.Y.Ywith your regional IP address range for the SCC relay.gcloud compute firewall-rules create to-databricks-control-plane \ --action ALLOW \ --rules tcp:443 \ --destination-ranges X.X.X.X/32,Y.Y.Y.Y/32 \ --direction EGRESS \ --priority 1000 \ --network <vpc-name>
If you use the default metastore, add a rule to allow connection to the metastore on port 3306. Use the following
gcloudCLI command to create this rule. Replace<vpc-name>with your VPC name. ReplaceX.X.X.Xwith your regional IP address range for the default metastore.gcloud compute firewall-rules create to-databricks-managed-hive \ --action ALLOW \ --rules tcp:3306 \ --destination-ranges X.X.X.X/32 \ --direction EGRESS \ --priority 1000 \ --network <vpc-name>
Important
If you deployed your own metastore instance, create a rule to allow connection to it instead of the default metastore.
Add any other network egress rules that your organization requires to allow required connections to data sources or other systems.
Important
For custom egress
ALLOWrules, set priority numbers in the range 1000-1099. It is important for the priority number to be lower than the value you used to block all egress, which is set to priority 1100 in the earlier steps.
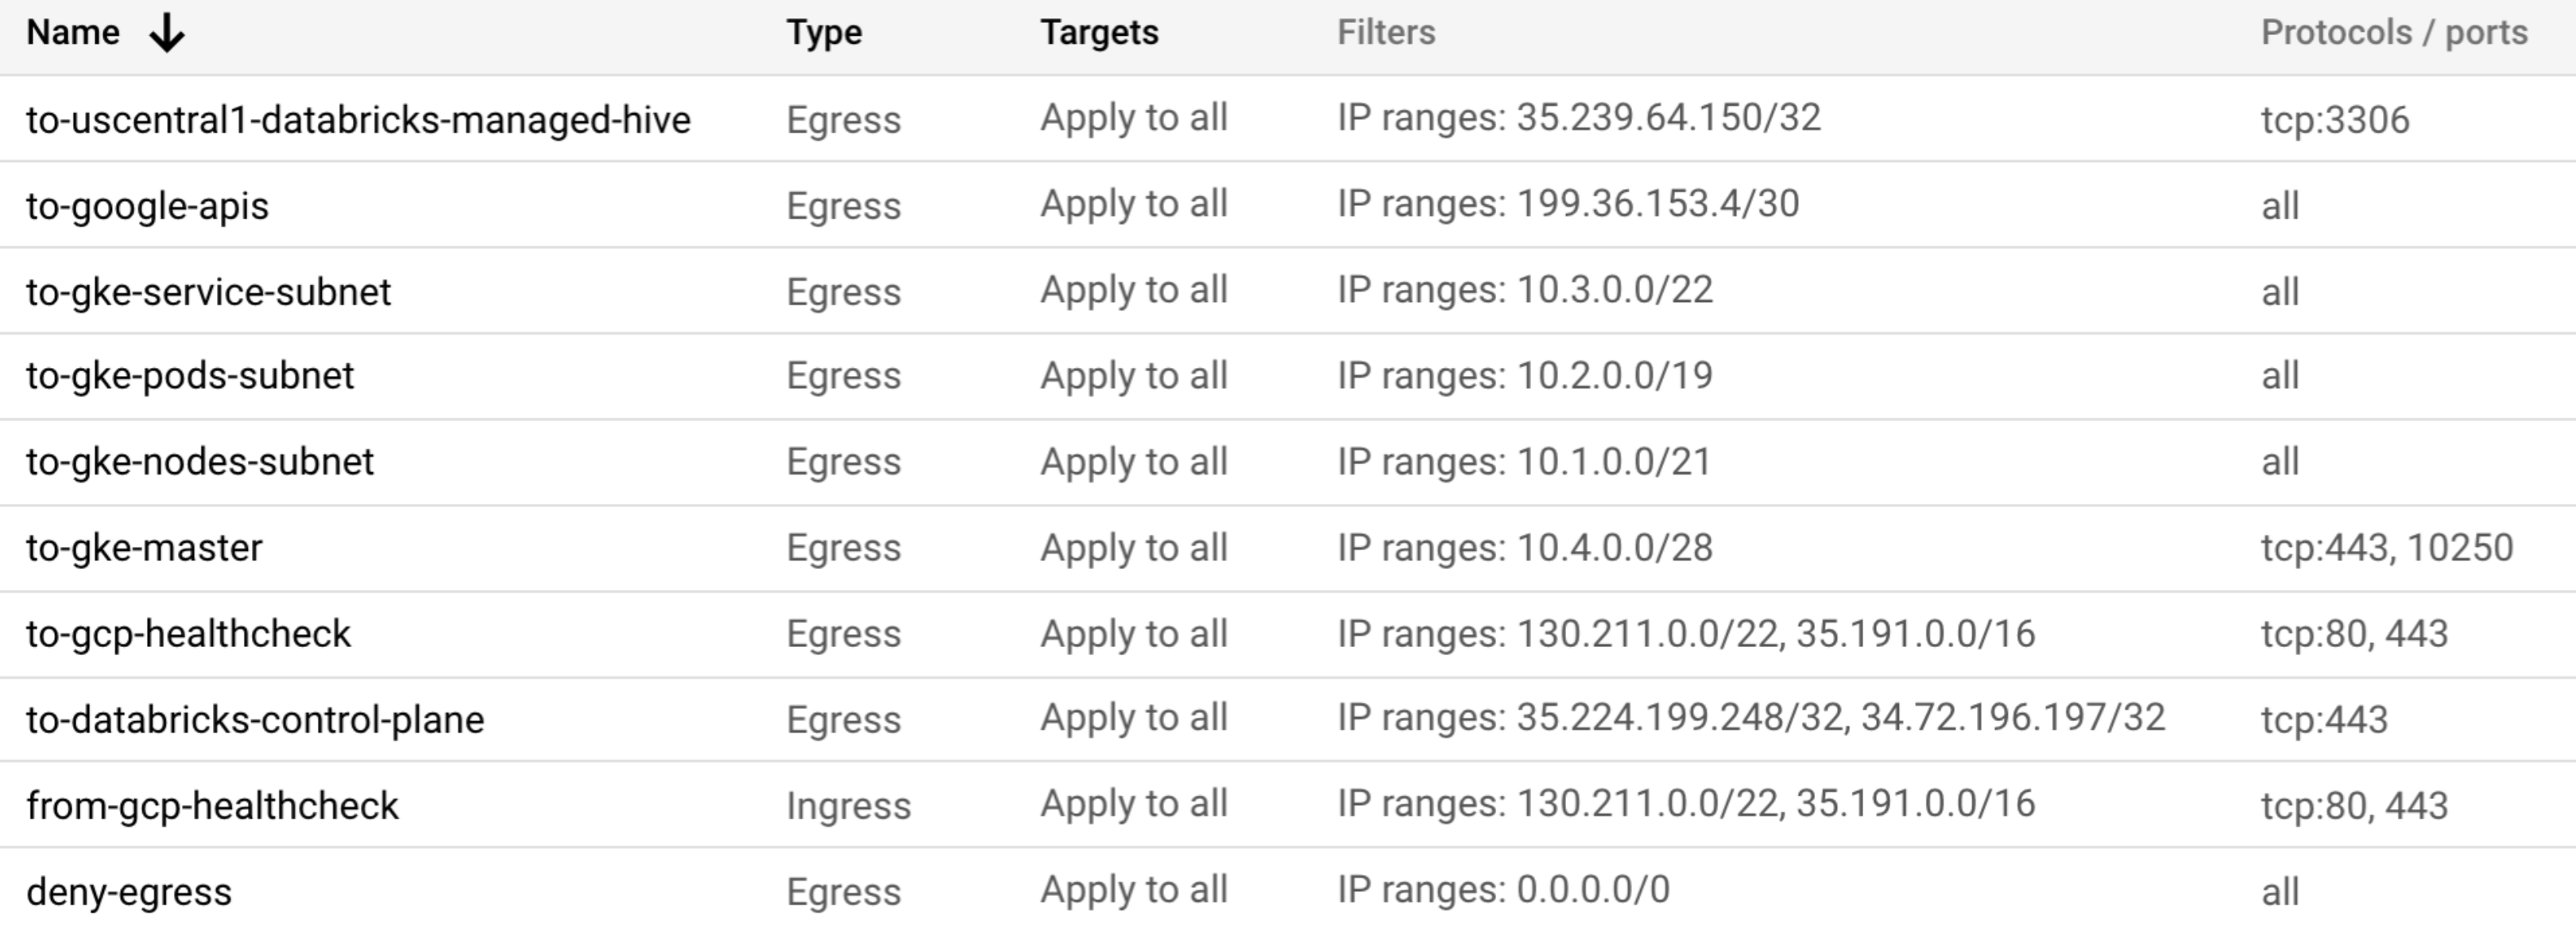
Your firewall rules should look similar to the following, though you must use the regional IP address for the control plane services for the region of your workspace.
Step 4: Update VPC Routes
Google Cloud routes define the paths that network traffic takes from a virtual machine (VM) instance to other destinations. In a VPC network, a route consists of a single destination prefix in CIDR format and a single next hop.
Remove the default route that was automatically created in the VPC, which is
0.0.0.0/0with the default internet gateway as the next hop. Use the console UI to remove this route to clear any paths to the internet.Go to the routes list in Google Cloud console.
Select the route to
0.0.0.0/0and click DELETE.
Create a route in the VPC to send traffic to the restricted Google APIs subnet (
199.36.153.4/30). Set the next hop asdefault-internet-gatewayas per the requirement for accessing private Google APIs.You can use the following
gcloudCLI command to create this route. Replace<vpc-name>with your VPC name. Replace<project-name>with your project name.gcloud beta compute routes create route-to-google-apis \ --project=<project-name> --description="Route to Google restricted APIs" \ --network=<vpc-name> \ --priority=1000 \ --destination-range=199.36.153.4/30 \ --next-hop-gateway=default-internet-gateway
Create a route to reach Databricks control plane services. Get the values for your region in IP addresses and domains for Databricks services and assets.
You can use the following
gcloudCLI command to create the route to the web application. Replace<vpc-name>with your VPC name. Replace<project-name>with your project name. ReplaceX.X.X.X/32with the regional IP address range for the web application.gcloud beta compute routes create route-to-databricks-scc-service \ --project=<project-name> --description="Route to Databricks web app" \ --network=<vpc-name> \ --priority=1000 \ --destination-range=X.X.X.X/32 \ --next-hop-gateway=default-internet-gateway
You can use the following
gcloudCLI command to create the route to the secure cluster connectivity relay. Replace<vpc-name>with your VPC name. Replace<project-name>with your project name. ReplaceX.X.X.X/32with the regional IP address range for the SCC relay.gcloud beta compute routes create route-to-databricks-scc-service \ --project=<project-name> --description="Route to Databricks SCC relay" \ --network=<vpc-name> \ --priority=1000 \ --destination-range=X.X.X.X/32 \ --next-hop-gateway=default-internet-gateway
If you use the default metastore, use the following
gcloudCLI command to create the route to the default metastore. Replace<vpc-name>with your VPC name. Replace<project-name>with your project name. ReplaceX.X.X.X/32with the regional IP address range for the metastore.gcloud beta compute routes create route-to-databricks-scc-service \ --project=<project-name> --description="Route to default metastore" \ --network=<vpc-name> \ --priority=1000 \ --destination-range=X.X.X.X/32 \ --next-hop-gateway=default-internet-gateway
Step 5: Create DNS zone for Google APIs so you can enable Google Private Access for GCS and GCR
You must now create a DNS zone for Google APIs, which is required to enable Google Private Access from the classic compute plane to the two Google APIs for GCS and GCR. For details about enabling GPA, see the Google documentation article Configure Private Google Access].
Customize the DNS in the VPC for the domain
googleapis.comusing Cloud DNS. Typicallygoogleapis.comresolves to public IP addresses, but for Google Private Access you must userestricted.googleapis.com. This domain resolves to a specific range199.36.153.4/30, which accessible within the Google Cloud network.The Databricks classic compute plane GKE cluster requires access to GCS and GCR. For PGA, you need to ensure that the access to restricted APIs is resolved or else GKE does not start successfully.
You can use the following
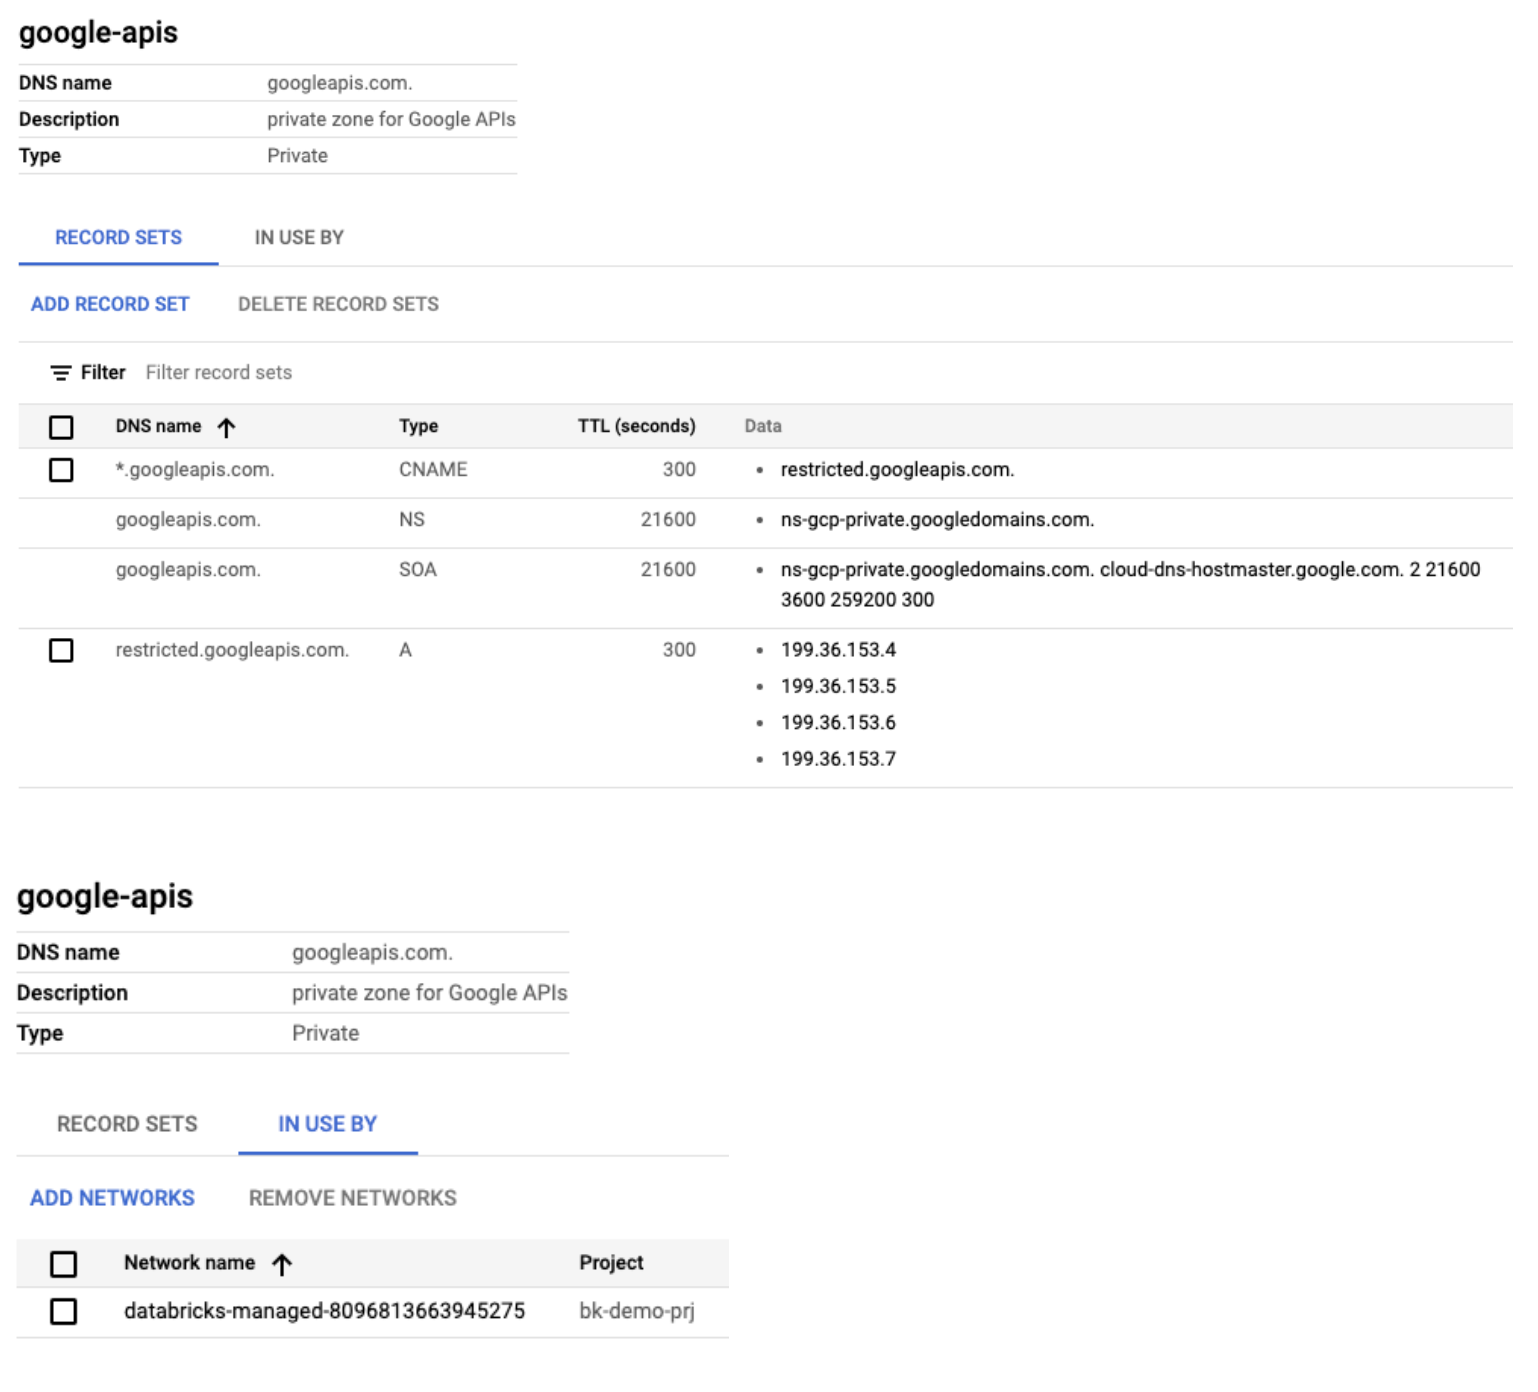
gcloudcommands create the DNS zone. Replace<vpc-name>with your VPC name.gcloud dns managed-zones create google-apis \ --description "private zone for Google APIs" \ --dns-name googleapis.com \ --visibility private \ --networks VPC-NAME gcloud dns record-sets transaction start --zone google-apis gcloud dns record-sets transaction add restricted.googleapis.com. \ --name *.googleapis.com \ --ttl 300 \ --type CNAME \ --zone google-apis gcloud dns record-sets transaction add "199.36.153.4" "199.36.153.5" "199.36.153.6" "199.36.153.7" \ --name restricted.googleapis.com \ --ttl 300 \ --type A \ --zone google-apis gcloud dns record-sets transaction execute --zone google-apis
The objects in Google Cloud Console look similar to the following:
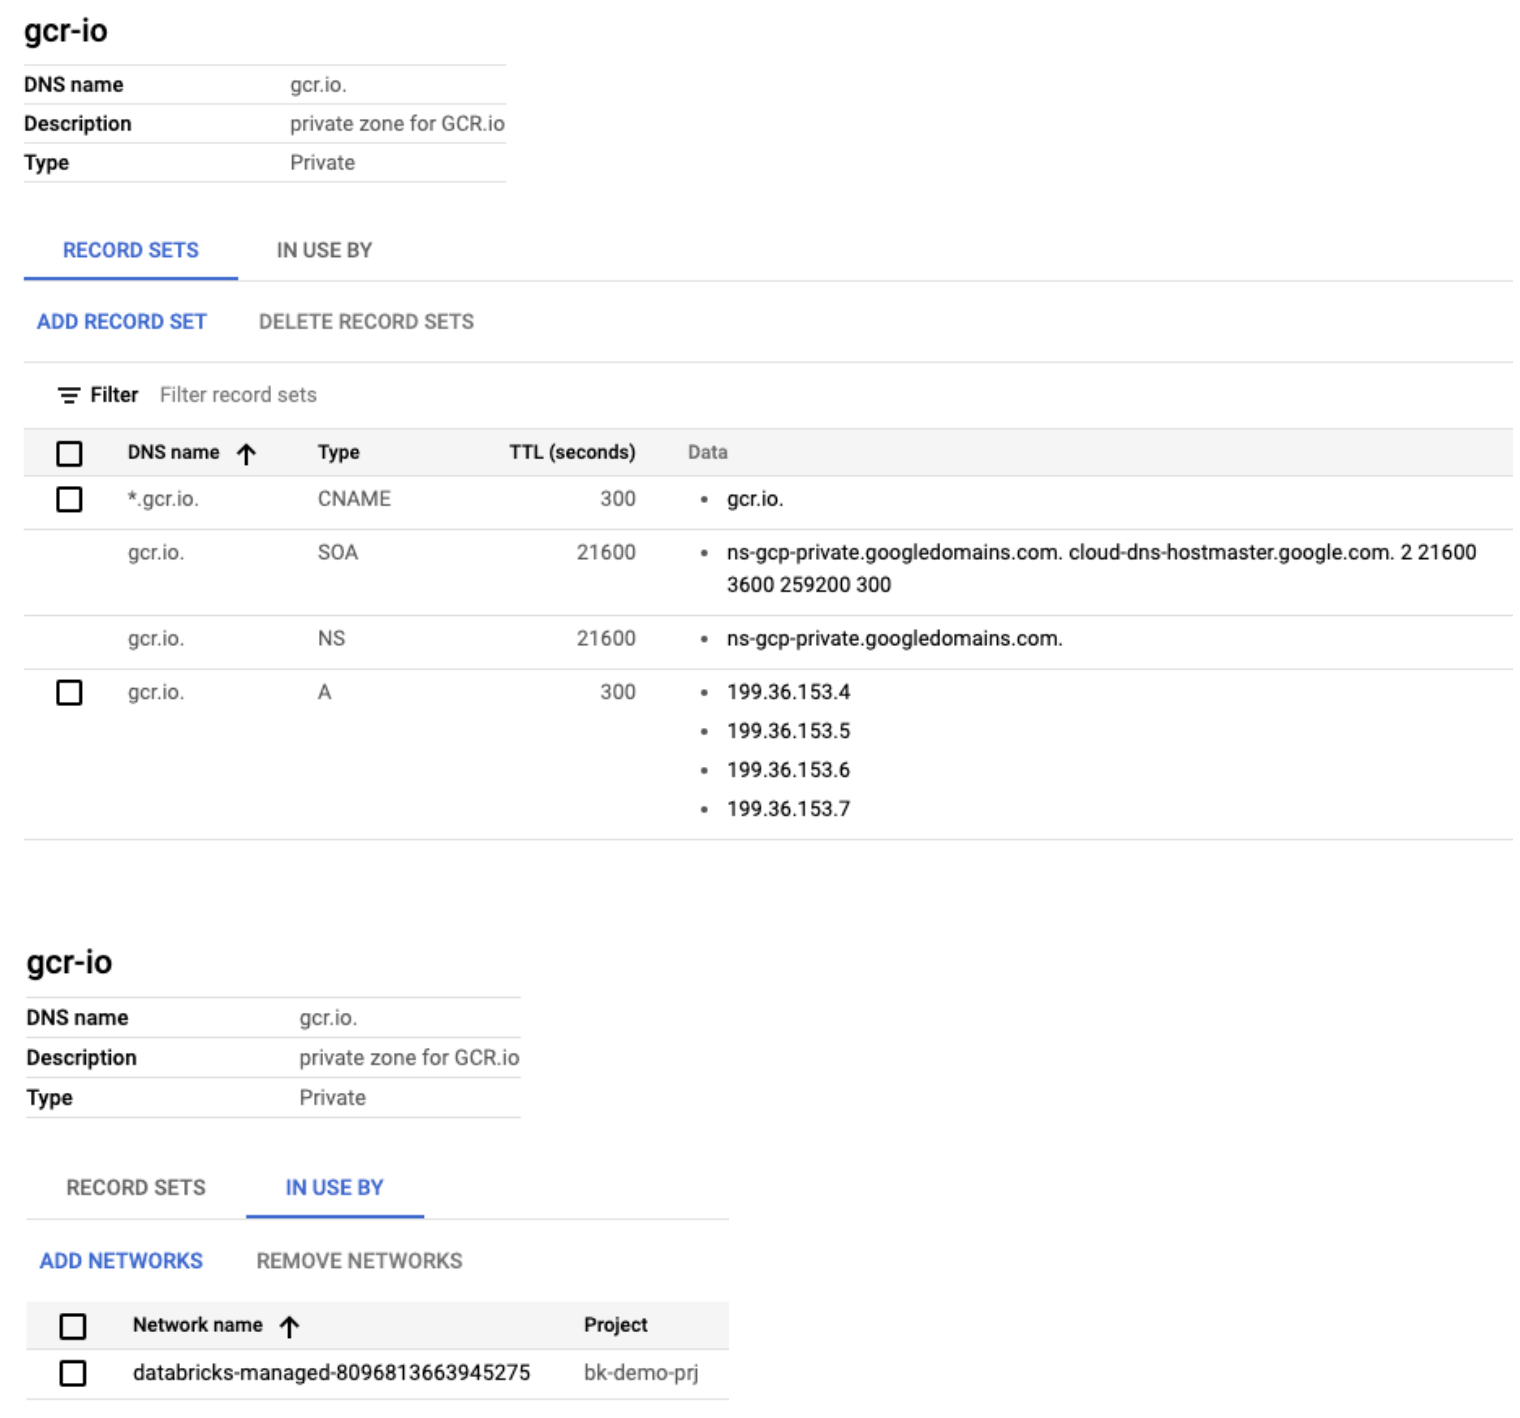
Make similar zone settings for the GCR.io domain to send traffic to restricted Google APIs subnet for reaching the container registry. Without these changes, the GKE cluster won’t stand up successfully since it won’t be able to pull down all the necessary Databricks runtime containers.
You can use the following
gcloudcommands to create these DNS zones. Replace<vpc-name>with your VPC name.gcloud dns managed-zones create gcr-io \ --description "private zone for GCR.io" \ --dns-name gcr.io \ --visibility private \ --networks <vpc-name> gcloud dns record-sets transaction start --zone gcr-io gcloud dns record-sets transaction add gcr.io. \ --name *.gcr.io \ --ttl 300 \ --type CNAME \ --zone gcr-io gcloud dns record-sets transaction add "199.36.153.4" "199.36.153.5" "199.36.153.6" "199.36.153.7" \ --name gcr.io \ --ttl 300 \ --type A \ --zone gcr-io gcloud dns record-sets transaction execute --zone gcr-io
The objects in Google Cloud Console look similar to the following:
Step 6: Validate configuration
Create a Databricks cluster and start it.
Wait to confirm that it starts successfully and has state Running.
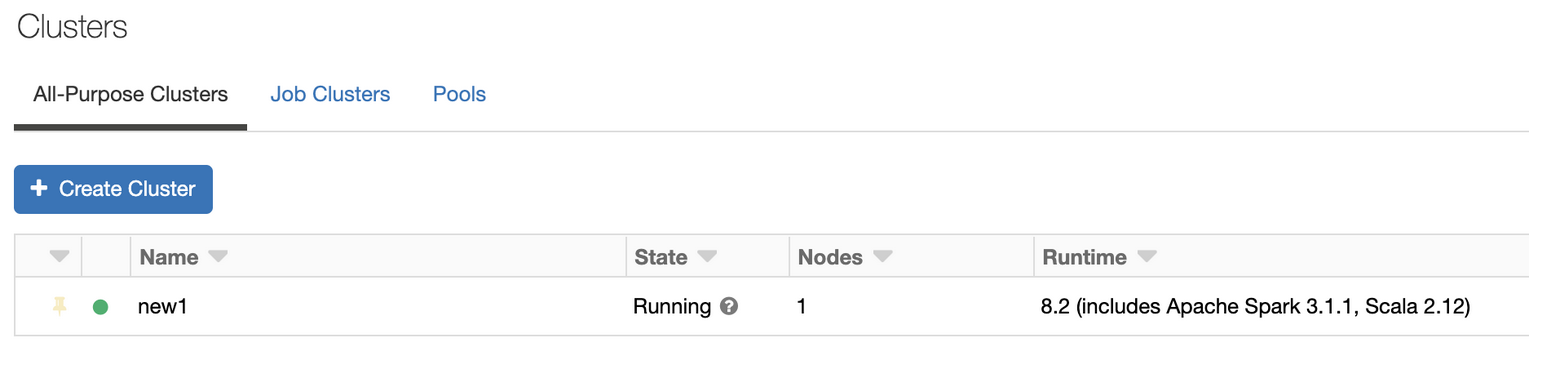
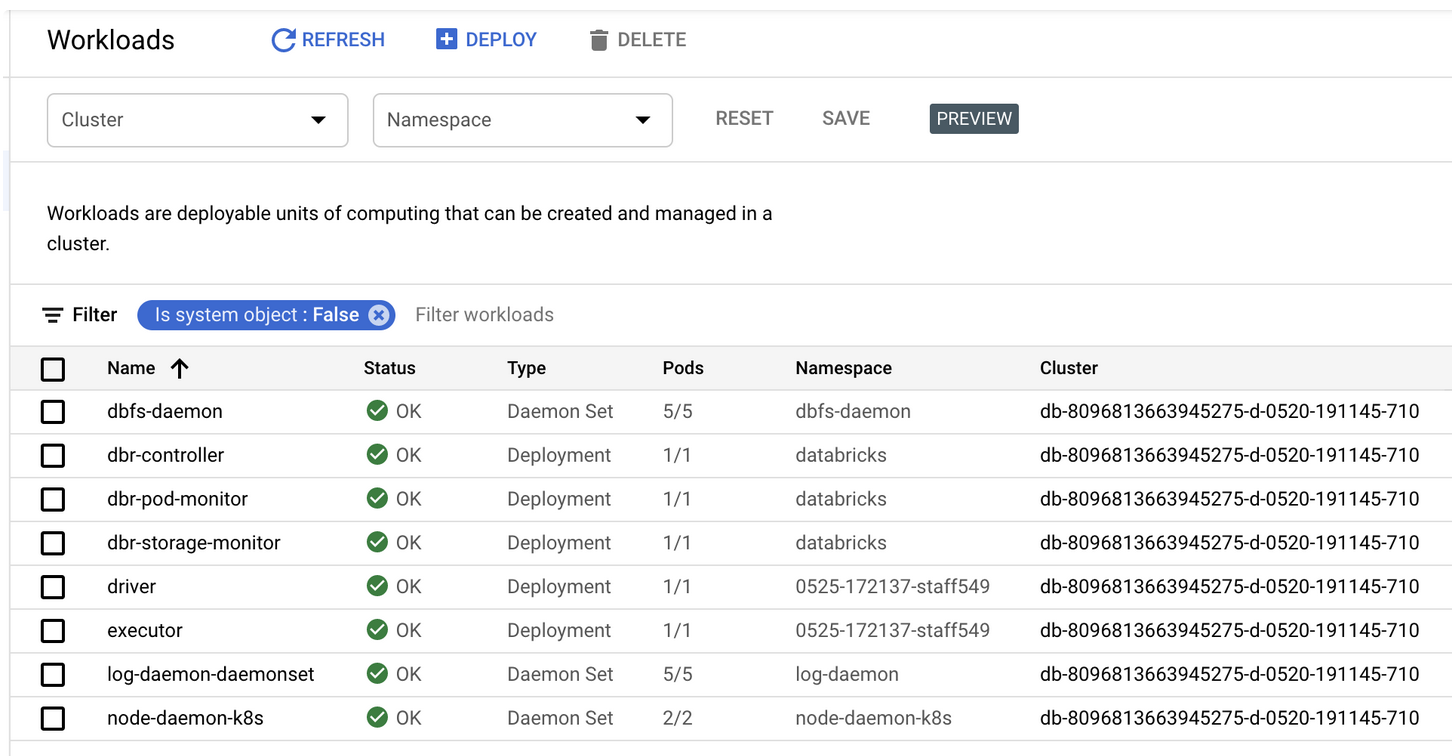
In the Cluster picker, choose your cluster. The cluster name for your workspace has the name
db-followed by the Databricks workspace ID which is a large number.Confirm that all services show status OK.
Troubleshooting
Cannot start GKE cluster
If the GKE cluster does not start, it is possible that DNS is misconfigured when Private Google Access is enabled on the VPC that is used by your Databricks workspace. If nodes are unable to resolve googleapis hostnames, it can result in the failure of their registration, which ultimately results in the unsuccessful creation of the GKE cluster.
You can view logs by checking the serial port logs of the corresponding GKE nodes. You might see errors like the following:
>>> [ 203.604558] configure.sh[948]: curl: (6) Couldn't resolve host '

>>> storage.googleapis.com'

>>> [ 203.605422] configure.sh[948]: == Failed to download

>>> https://storage.googleapis.com/gke-release/npd-custom-plugins/v1.0.1/npd-custom-plugins-v1.0.1.tar.gz.

>>> Retrying. ==

>>> [ 203.614049] configure.sh[948]:

>>> https://www.googleapis.com/auth/devstorage.read_write
Since the cluster is using a VPC network, the subnet that this cluster is on has Private Google Access enabled. You’ll need to complete the Private Google Access setup by following instructions in this Google PGA documentation.
GKE cluster stops working or cannot start it after it could successfully start in previous attempts
You might find that the GKE cluster stops working or cannot start the GKE cluster due to misconfigured Compute Engine Service Account on the project hosting GKE. The Compute Engine default service account that is associated with the nodes of the problematic cluster has been in the ‘disabled’ state or does not have the required bare minimum role. The service account is <project-id>-compute@developer.gserviceaccount.com.
The cause for the node registration failure may be due to the disabled status of this service account, which is being attached to that nodes of the problematic cluster.
Try to enable the service account by following this Google help center article and attempt to recreate the cluster or node pool to see if it resolves the issue.
You could also try using Google Cloud Console to look at your IAM and Admin page for service accounts and the corresponding nodes of problematic cluster.
By default, the Compute Engine default service account is created with the IAM project editor role. You could change it to the bare minimum required role as follows:
Get current roles that are assigned to the default compute service account.
gcloud projects get-iam-policy {{project-id}}  \
--flatten="bindings[].members" \
--format='table(bindings.role)' \
--filter="bindings.members:{{project-id}}-compute@developer.gserviceaccount.com"
Add required minimum roles to the default compute service account
gcloud projects add-iam-policy-binding {{project-id}} \
--member "serviceAccount:{{project-id}}-compute@developer.gserviceaccount.com" \
--role roles/logging.logWriter

gcloud projects add-iam-policy-binding {{project-id}} \
--member "serviceAccount:{{project-id}}-compute@developer.gserviceaccount.com" \
--role roles/monitoring.metricWriter

gcloud projects add-iam-policy-binding {{project-id}} \
--member "serviceAccount:{{project-id}}-compute@developer.gserviceaccount.com" \
--role roles/monitoring.viewer

gcloud projects add-iam-policy-binding {{project-id}} \
--member "serviceAccount:{{project-id}}-compute@developer.gserviceaccount.com" \
--role roles/stackdriver.resourceMetadata.writer
Remove the project editor role from the default compute service account.
gcloud projects remove-iam-policy-binding {{project-id}} \
--member "serviceAccount:{{project-id}}-compute@developer.gserviceaccount.com" \
--role roles/editor
Validate roles assigned to the default compute service account.
gcloud projects get-iam-policy {{project-id}}  \
--flatten="bindings[].members" \
--format='table(bindings.role)' \
--filter="bindings.members:{{project-id}}-compute@developer.gserviceaccount.com"
Ensure that this service account has right set of roles on the project.