Connect to Looker
This article describes how to use Looker with a Databricks cluster or Databricks SQL warehouse (formerly Databricks SQL endpoint).
Important
When persistent derived tables (PDTs) are enabled, by default Looker regenerates PDTs every 5 minutes by connecting to the associated database. Databricks recommends that you change the default frequency to avoid incurring excess compute costs. For more information, see Enable and manage persistent derived tables (PDTs).
Requirements
Before you connect to Looker manually, you need the following:
A cluster or SQL warehouse in your Databricks workspace.
The connection details for your cluster or SQL warehouse, specifically the Server Hostname, Port, and HTTP Path values.
A Databricks personal access token. To create a personal access token, follow the steps in Databricks personal access tokens for workspace users.
Note
As a security best practice, when you authenticate with automated tools, systems, scripts, and apps, Databricks recommends that you use personal access tokens belonging to service principals instead of workspace users. To create tokens for service principals, see Manage tokens for a service principal.
Connect to Looker manually
To connect to Looker manually, do the following:
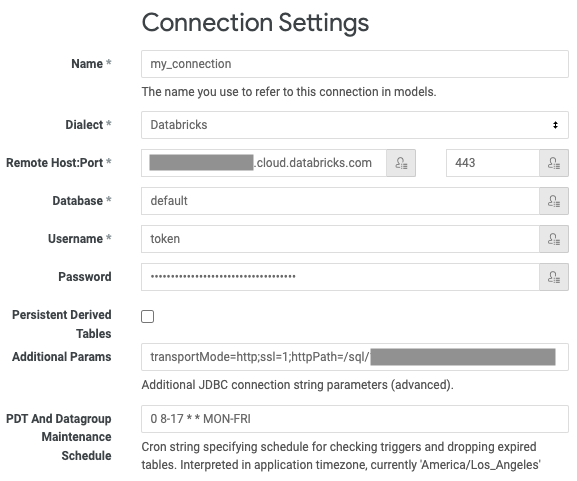
In Looker, click Admin > Connections > Add Connection.

Enter a unique Name for the connection.
Tip
Connection names should contain only lowercase letters, numbers, and underscores. Other characters might be accepted but could cause unexpected results later.
For Dialect, select Databricks.
For Remote Host, enter the Server Hostname from the requirements.
For Port, enter the Port from the requirements.
For Database, enter the name of the database in the workspace that you want to access through the connection (for example,
default).For Username, enter the word
token.For Password, enter your personal access token from the requirements.
For Additional Params, enter
transportMode=http;ssl=1;httpPath=<http-path>, replacing<http-path>with the HTTP Path value from the requirements.For PDT And Datagroup Maintenance Schedule, enter a valid
cronexpression to change the default frequency for regenerating PDTs. The default frequency is every five minutes.If you want to translate queries into other time zones, adjust Query Time Zone.
For the remaining fields, keep the defaults, in particular:
Keep the Max Connections and Connection Pool Timeout defaults.
Leave Database Time Zone blank (assuming that you are storing everything in UTC).
Click Test These Settings.
If the test succeeds, click Add Connection.
Model your database in Looker
This section creates a project and runs the generator. The following steps assume that there are permanent tables stored in the database for your connection.
On the Develop menu, turn on Development Mode.
Click Develop > Manage LookML Projects.
Click New LookML Project.
Enter a unique Project Name.
Tip
Project names should contain only lowercase letters, numbers, and underscores. Other characters might be accepted but could produce unexpected results later.
For Connection, select the name of the connection from Step 2.
For Schemas, enter
default, unless you have other databases to model through the connection.For the remaining fields, keep the defaults, in particular:
Leave Starting Point set to Generate Model from Database Schema.
Leave Build Views From set to All Tables.
Click Create Project.
After you create the project and the generator runs, Looker displays a user interface with one .model file and multiple .view files. The .model file shows the tables in the schema and any discovered join relations between them, and the .view files list each dimension (column) available for each table in the schema.
Enable and manage persistent derived tables (PDTs)
Looker can reduce query times and database loads by creating persistent derived tables (PDTs). A PDT is a derived table that Looker writes into a scratch schema in your database. Looker then regenerates the PDT on the schedule that you specify. For more information, see Persistent derived tables (PDTs) in the Looker documentation.
To enable PDTs for a database connection, select Persistent Derived Tables for that connection and complete the on-screen instructions. For more information, see Persistent Derived Tables and Configuring Separate Login Credentials for PDT Processes in the Looker documentation.
When PDTs are enabled, by default Looker regenerates PDTs every 5 minutes by connecting to the associated database. Looker restarts the associated Databricks resource if it is stopped. Databricks recommends that you change the default frequency by setting the PDT And Datagroup Maintenance Schedule field for your database connection to a valid cron expression. For more information, see PDT and Datagroup Maintenance Schedule in the Looker documentation.
To enable PDTs or to change the PDT regeneration frequency for an existing database connection, click Admin > Database Connections, click Edit next to your database connection, and follow the preceding instructions.