Run MLflow Projects on Databricks
Warning
MLflow Projects is no longer supported.
An MLflow Project is a format for packaging data science code in a reusable and reproducible way. The MLflow Projects component includes an API and command-line tools for running projects, which also integrate with the Tracking component to automatically record the parameters and git commit of your source code for reproducibility.
This article describes the format of an MLflow Project and how to run an MLflow project remotely on Databricks clusters using the MLflow CLI, which makes it easy to vertically scale your data science code.
MLflow project format
Any local directory or Git repository can be treated as an MLflow project. The following conventions define a project:
The project’s name is the name of the directory.
The software environment is specified in
python_env.yaml, if present. If nopython_env.yamlfile is present, MLflow uses a virtualenv environment containing only Python (specifically, the latest Python available to virtualenv) when running the project.Any
.pyor.shfile in the project can be an entry point, with no parameters explicitly declared. When you run such a command with a set of parameters, MLflow passes each parameter on the command line using--key <value>syntax.
You specify more options by adding an MLproject file, which is a text file in YAML syntax. An example MLproject file looks like this:
name: My Project

python_env: python_env.yaml

entry_points:
  main:
    parameters:
      data_file: path
      regularization: {type: float, default: 0.1}
    command: "python train.py -r {regularization} {data_file}"
  validate:
    parameters:
      data_file: path
    command: "python validate.py {data_file}"
For Databricks Runtime 13.0 ML and above, MLflow Projects cannot successfully run within a Databricks job type cluster. In order to migrate existing MLflow Projects to Databricks Runtime 13.0 ML and above, see MLflow Databricks Spark job project format.
MLflow Databricks Spark job project format
MLflow Databricks Spark job project is a type of MLflow Project introduced in MLflow 2.14. This project type supports running MLflow Projects from within a Spark Jobs cluster and can only be run using the databricks backend.
Databricks Spark job projects must set either databricks_spark_job.python_file or entry_points. Not specifying either or specifying both settings raises an exception.
The following is an example of an MLproject file that uses the databricks_spark_job.python_file setting. This setting involves using a hardcoded path for the Python run file and its arguments.
name: My Databricks Spark job project 1

databricks_spark_job:
    python_file: "train.py"   # the file which is the entry point file to execute
    parameters: ["param1", "param2"]   # a list of parameter strings
    python_libraries:   # dependencies required by this project
      - mlflow==2.4.1   # MLflow dependency is required
      - scikit-learn
The following is an example of an MLproject file that uses the entry_points setting:
name: My Databricks Spark job project 2

databricks_spark_job:
    python_libraries: # dependencies to be installed as databricks cluster libraries
      - mlflow==2.4.1
      - scikit-learn

entry_points:
  main:
    parameters:
      model_name: {type: string, default: model}
      script_name: {type: string, default: train.py}
    command: "python {script_name} {model_name}"
The entry_points setting lets you pass in parameters that are using command line params, like:
mlflow run . -b databricks --backend-config cluster-spec.json \
 -P script_name=train.py -P model_name=model123 \
 --experiment-id <experiment-id>
The following limitations apply for Databricks Spark job projects:
This project type does not support specifying the following sections in the
MLprojectfile:docker_env,python_env, orconda_env.Dependencies for your project must be specified in the
python_librariesfield of thedatabricks_spark_jobsection. Versions of Python cannot be customized with this project type.The running environment must use the main Spark driver runtime environment to run in jobs clusters that use Databricks Runtime 13.0 or above.
Likewise, all Python dependencies that are defined as required for the project must be installed as Databricks cluster dependencies. This behavior is different from previous project run behaviors where libraries needed to be installed in a separate environment.
Run an MLflow project
To run an MLflow project on a Databricks cluster in the default workspace, use the command:
mlflow run <uri> -b databricks --backend-config <json-new-cluster-spec>
where <uri> is a Git repository URI or folder containing an MLflow project and <json-new-cluster-spec> is a JSON document containing a new_cluster structure. The Git URI should be of the form: https://github.com/<repo>#<project-folder>.
An example cluster specification is:
{
  "spark_version": "7.5.x-scala2.12",
  "num_workers": 1,
  "node_type_id": "memoptimized-cluster-1"
}
If you need to install libraries on the worker, use the “cluster specification” format. Note that Python wheel files must be uploaded to DBFS and specified as pypi dependencies. For example:
{
  "new_cluster": {
    "spark_version": "7.5.x-scala2.12",
    "num_workers": 1,
    "node_type_id": "memoptimized-cluster-1"
  },
  "libraries": [
    {
      "pypi": {
        "package": "tensorflow"
      }
    },
    {
      "pypi": {
         "package": "/dbfs/path_to_my_lib.whl"
      }
    }
  ]
}
Important
.eggand.jardependencies are not supported for MLflow projects.Execution for MLflow projects with Docker environments is not supported.
You must use a new cluster specification when running an MLflow Project on Databricks. Running Projects against existing clusters is not supported.
Using SparkR
In order to use SparkR in an MLflow Project run, your project code must first install and import SparkR as follows:
if (file.exists("/databricks/spark/R/pkg")) {
    install.packages("/databricks/spark/R/pkg", repos = NULL)
} else {
    install.packages("SparkR")
}

library(SparkR)
Your project can then initialize a SparkR session and use SparkR as normal:
sparkR.session()
...
Example
This example shows how to create an experiment, run the MLflow tutorial project on a Databricks cluster, view the job run output, and view the run in the experiment.
Requirements
Install MLflow using
pip install mlflow.Install and configure the Databricks CLI. The Databricks CLI authentication mechanism is required to run jobs on a Databricks cluster.
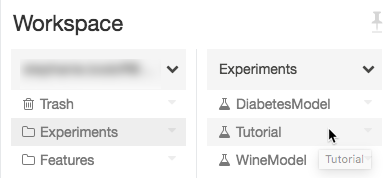
Step 1: Create an experiment
In the workspace, select Create > MLflow Experiment.
In the Name field, enter
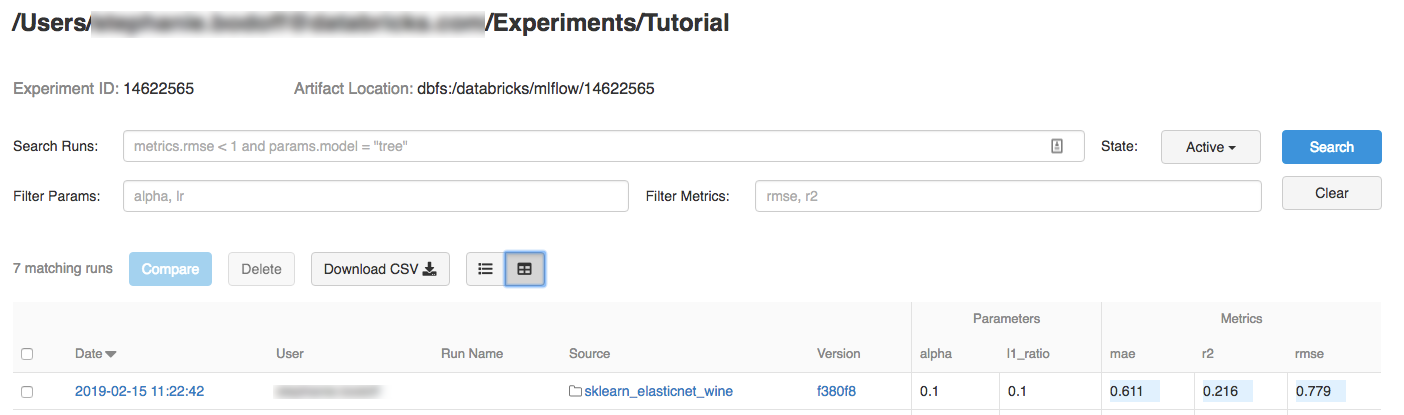
Tutorial.Click Create. Note the Experiment ID. In this example, it is
14622565.
Step 2: Run the MLflow tutorial project
The following steps set up the MLFLOW_TRACKING_URI environment variable and run the project, recording the training parameters, metrics, and the trained model to the experiment noted in the preceding step:
Set the
MLFLOW_TRACKING_URIenvironment variable to the Databricks workspace.export MLFLOW_TRACKING_URI=databricks
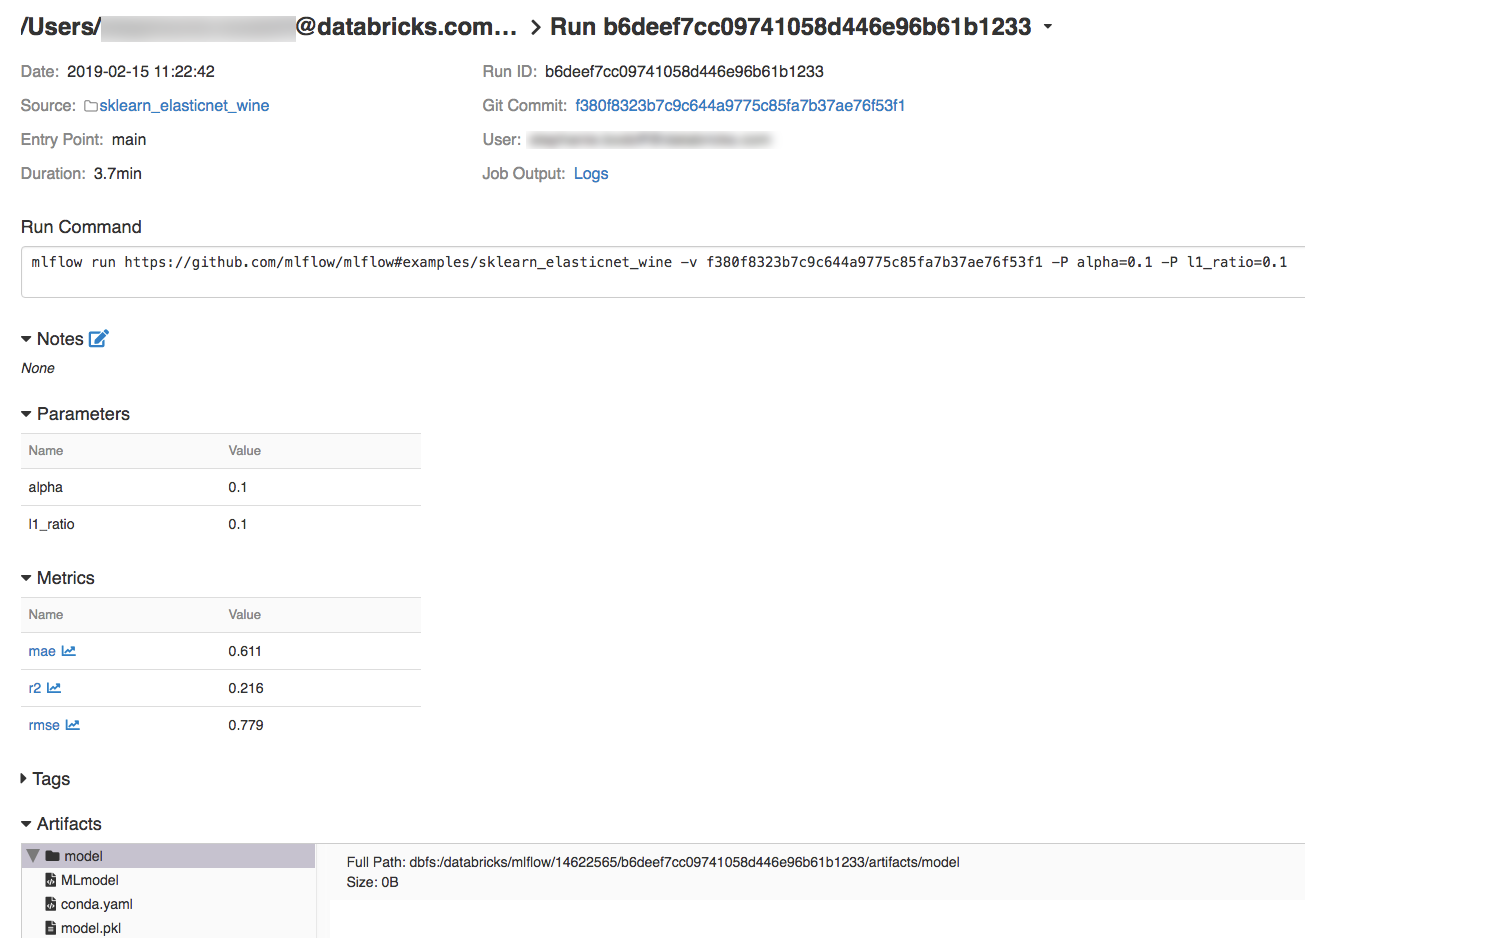
Run the MLflow tutorial project, training a wine model. Replace
<experiment-id>with the Experiment ID you noted in the preceding step.mlflow run https://github.com/mlflow/mlflow#examples/sklearn_elasticnet_wine -b databricks --backend-config cluster-spec.json --experiment-id <experiment-id>
=== Fetching project from https://github.com/mlflow/mlflow#examples/sklearn_elasticnet_wine into /var/folders/kc/l20y4txd5w3_xrdhw6cnz1080000gp/T/tmpbct_5g8u ===
=== Uploading project to DBFS path /dbfs/mlflow-experiments/<experiment-id>/projects-code/16e66ccbff0a4e22278e4d73ec733e2c9a33efbd1e6f70e3c7b47b8b5f1e4fa3.tar.gz ===
=== Finished uploading project to /dbfs/mlflow-experiments/<experiment-id>/projects-code/16e66ccbff0a4e22278e4d73ec733e2c9a33efbd1e6f70e3c7b47b8b5f1e4fa3.tar.gz ===
=== Running entry point main of project https://github.com/mlflow/mlflow#examples/sklearn_elasticnet_wine on Databricks ===
=== Launched MLflow run as Databricks job run with ID 8651121. Getting run status page URL... ===
=== Check the run's status at https://<databricks-instance>#job/<job-id>/run/1 ===
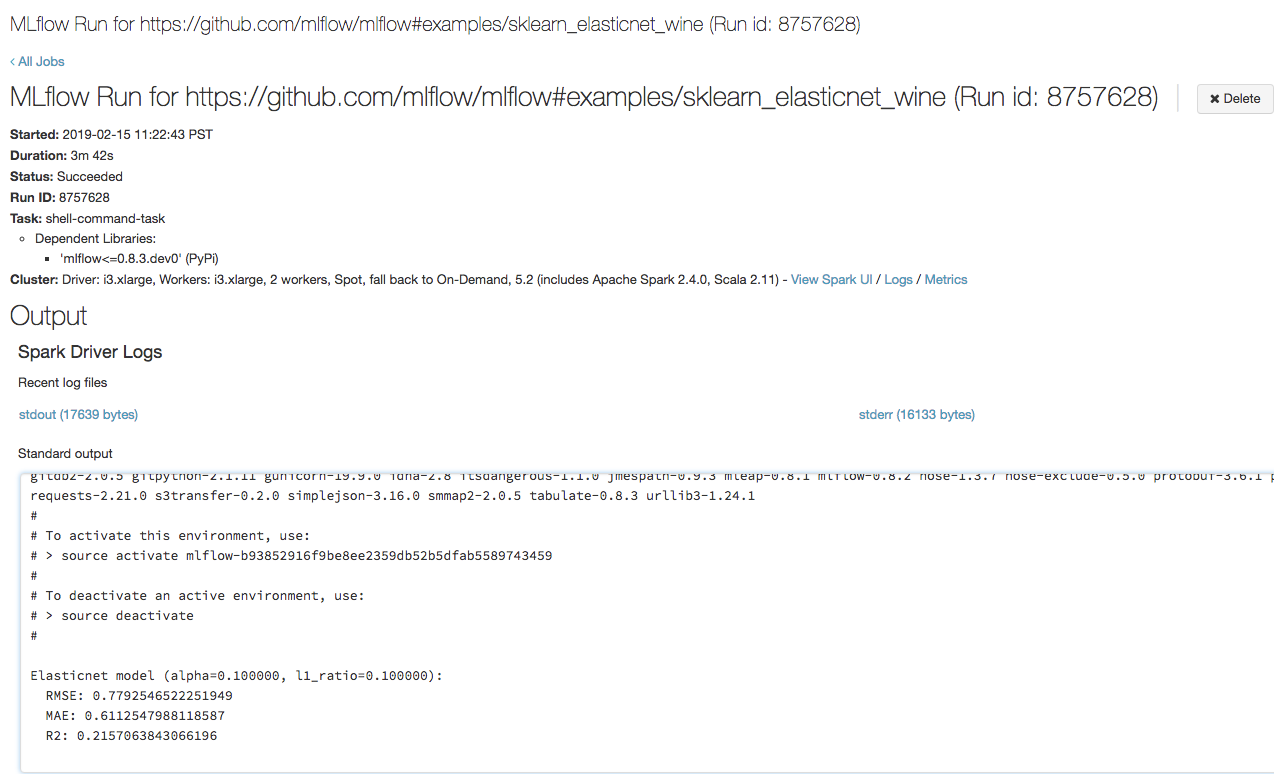
Copy the URL
https://<databricks-instance>#job/<job-id>/run/1in the last line of the MLflow run output.
Resources
For some example MLflow projects, see the MLflow App Library, which contains a repository of ready-to-run projects aimed at making it easy to include ML functionality into your code.