CI/CD techniques with Git and Databricks Git folders (Repos)
Learn techniques for using Databricks Git folders in CI/CD workflows. By configuring Databricks Git folders in the workspace, you can use source control for project files in Git repositories and you can integrate them into your data engineering pipelines.
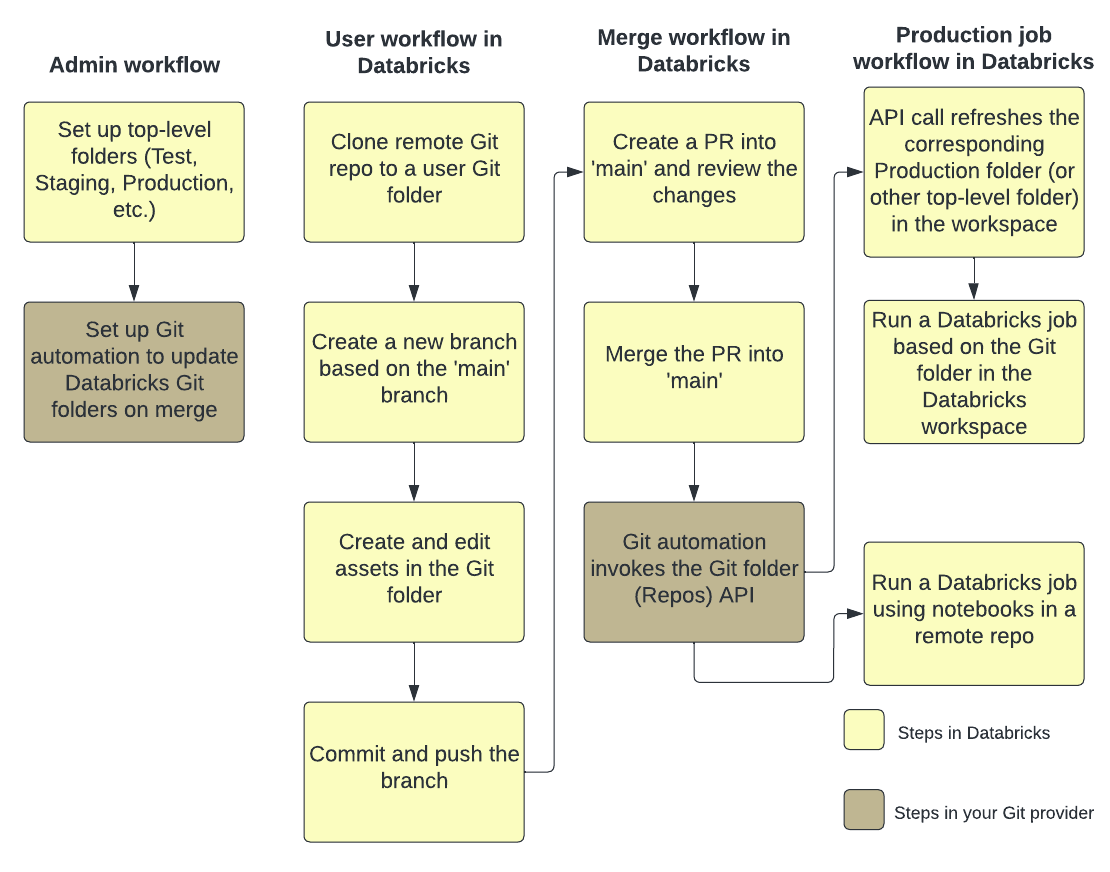
The following figure shows an overview of the techniques and workflow.
For an overview of CI/CD with Databricks, see What is CI/CD on Databricks?.
Development flow
Databricks Git folders have user-level folders. User-level folders are automatically created when users first clone a remote repository. You can think of Databricks Git folders in user folders as “local checkouts” that are individual for each user and where users make changes to their code.
In your user folder in Databricks Git folders, clone your remote repository. A best practice is to create a new feature branch or select a previously created branch for your work, instead of directly committing and pushing changes to the main branch. You can make changes, commit, and push changes in that branch. When you are ready to merge your code, you can do so in the Git folders UI.
Requirements
This workflow requires that you have already set up your Git integration.
Note
Databricks recommends that each developer works on their own feature branch. For information about how to resolve merge conflicts, see Resolve merge conflicts.
Collaborate in Git folders
The following workflow uses a branch called feature-b that is based on the main branch.
Clone your existing Git repository to your Databricks workspace.
Use the Git folders UI to create a feature branch from the main branch. This example uses a single feature branch
feature-bfor simplicity. You can create and use multiple feature branches to do your work.Make your modifications to Databricks notebooks and other files in the repo.
Contributors can now clone the Git repository into their own user folder.
Working on a new branch, a coworker makes changes to the notebooks and other files in the Git folder.
The contributor commits and pushes their changes to the Git provider.
To merge changes from other branches or rebase the feature-b branch in Databricks, in the Git folders UI use one of the following workflows:
Merge branches. If there’s no conflict, the merge is pushed to the remote Git repository using
git push.
When you are ready to merge your work to the remote Git repository and
mainbranch, use the Git folders UI to merge the changes from feature-b. If you prefer, you can instead merge changes directly to the Git repository backing your Git folder.
Production job workflow
Databricks Git folders provides two options for running your production jobs:
Option 1: Provide a remote Git reference in the job definition. For example, run a specific notebook in the
mainbranch of a Git repository.Option 2: Set up a production Git repository and call Repos APIs to update it programmatically. Run jobs against the Databricks Git folder that clones this remote repository. The Repos API call should be the first task in the job.
Option 1: Run jobs using notebooks in a remote repository
Simplify the job definition process and keep a single source of truth by running a Databricks job using notebooks located in a remote Git repository. This Git reference can be a Git commit, tag, or branch and is provided by you in the job definition.
This helps prevent unintentional changes to your production job, such as when a user makes local edits in a production repository or switches branches. It also automates the CD step as you do not need to create a separate production Git folder in Databricks, manage permissions for it, and keep it updated.
See Use Git with jobs.
Option 2: Set up a production Git folder and Git automation
In this option, you set up a production Git folder and automation to update the Git folder on merge.
Step 1: Set up top-level folders
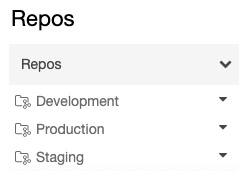
The admin creates non-user top-level folders. The most common use case for these top-level folders is to create development, staging, and production folders that contain Databricks Git folders for the appropriate versions or branches for development, staging, and production. For example, if your company uses the main branch for production, the “production” Git folder must have the main branch checked out in it.
Typically permissions on these top-level folders are read-only for all non-admin users within the workspace. For such top-level folders we recommend you only provide service principal(s) with CAN EDIT and CAN MANAGE permissions to avoid accidental edits to your production code by workspace users.
Step 2: Set up automated updates to Databricks Git folders with the Git folders API
To keep a Git folder in Databricks at the latest version, you can set up Git automation to call the Repos API. In your Git provider, set up automation that, after every successful merge of a PR into the main branch, calls the Repos API endpoint on the appropriate Git folder to update it to the latest version.
For example, on GitHub this can be achieved with GitHub Actions. For more information, see the Repos API.
Use a service principal for automation with Databricks Git folders
You can use either the Databricks account console or the Databricks CLI to create a service principal authorized to access your workspace’s Git folders.
To create a new service principal, see Manage service principals. When you have a service principal in your workspace, you can link your Git credentials to it so it can access your workspace’s Git folders as part of your automation.
Authorize a service principal to access Git folders
To provide authorized access to your Git folders for a service principal using the Databricks account console:
Log in to your Databricks workspace. You must have administrator privileges to your workspace to complete these steps. If you do not have administrator privileges for your workspace, request them or contact your account administrator.
In the upper-right corner of any page, click your username, then select Settings.
Select Identity and access under Workspace admin in the left navigation pane, and then select the Manage button for Service Principals.

From the list of service principals, select the one you want to update with Git credentials. You can also create a new service principal by selecting Add service principal.

Select the Git integration tab. (If you didn’t create the service principal or haven’t been assigned the service principal manager privilege on it, it will be greyed out.) Under it, choose the Git provider for the credentials (such as GitHub), select Link Git account, and then select Link.
You can also use a Git personal access token (PAT) if you do not want to link your own Git credentials. To use a PAT instead, select Personal access token and provide the token information for the Git account to use when authenticating the service principal’s access. For more details on acquiring a PAT from a Git provider, see Configure Git credentials & connect a remote repo to Databricks.

You will be prompted to select the Git user account to link. Choose the Git user account the service principal will use for access and select Continue. (If you do not see the user account you want to use, select Use a different account.)
In the next dialog, select Authorize Databricks. You will briefly see the message “Linking account…” and then the updated service principal details.

The service principal you chose will now apply the linked Git credentials when accessing your Databricks workspace Git folder resources as part of your automation.
Terraform integration
You can also manage Databricks Git folders in a fully automated setup using Terraform and databricks_repo:
resource "databricks_repo" "this" {
  url = "https://github.com/user/demo.git"
}
To use Terraform to add Git credentials to a service principal, add the following configuration:
  provider "databricks" {
    # Configuration options
  }

  provider "databricks" {
    alias = "sp"
    host = "https://....cloud.databricks.com"
    token = databricks_obo_token.this.token_value
  }

  resource "databricks_service_principal" "sp" {
    display_name = "service_principal_name_here"
  }

  resource "databricks_obo_token" "this" {
    application_id   = databricks_service_principal.sp.application_id
    comment          = "PAT on behalf of ${databricks_service_principal.sp.display_name}"
    lifetime_seconds = 3600
  }

  resource "databricks_git_credential" "sp" {
    provider = databricks.sp
    depends_on = [databricks_obo_token.this]
    git_username          = "myuser"
    git_provider          = "azureDevOpsServices"
    personal_access_token = "sometoken"
  }
Configure an automated CI/CD pipeline with Databricks Git folders
Here is a simple automation that can be run as a GitHub Action.
Requirements
You have created a Git folder in a Databricks workspace that is tracking the base branch being merged into.
You have a Python package that creates the artifacts to place into a DBFS location. Your code must:
Update the repository associated with your preferred branch (such as
development) to contain the latest versions of your notebooks.Build any artifacts and copy them to the library path.
Replace the last versions of build artifacts to avoid having to manually update artifact versions in your job.
Create an automated CI/CD workflow
Set up secrets so your code can access the Databricks workspace. Add the following secrets to the Github repository:
DEPLOYMENT_TARGET_URL: Set this to your workspace URL. Do not include the
/?osubstring.DEPLOYMENT_TARGET_TOKEN: Set this to a Databricks Personal Access Token (PAT). You can generate a Databricks PAT by following the instructions in Databricks personal access token authentication.
Navigate to the Actions tab of your Git repository and click the New workflow button. At the top of the page, select Set up a workflow yourself and paste in this script:

# This is a basic automation workflow to help you get started with GitHub Actions.

name: CI

# Controls when the workflow will run
on:
  # Triggers the workflow on push for main and dev branch
  push:
    paths-ignore:
      - .github
    branches:
      # Set your base branch name here
      - your-base-branch-name

# A workflow run is made up of one or more jobs that can run sequentially or in parallel
jobs:
  # This workflow contains a single job called "deploy"
  deploy:
    # The type of runner that the job will run on
    runs-on: ubuntu-latest
    environment: development
    env:
      DATABRICKS_HOST: ${{ secrets.DEPLOYMENT_TARGET_URL }}
      DATABRICKS_TOKEN:  ${{ secrets.DEPLOYMENT_TARGET_TOKEN }}
      REPO_PATH: /Workspace/Users/someone@example.com/workspace-builder
      DBFS_LIB_PATH: dbfs:/path/to/libraries/
      LATEST_WHEEL_NAME: latest_wheel_name.whl

    # Steps represent a sequence of tasks that will be executed as part of the job
    steps:
    # Checks-out your repository under $GITHUB_WORKSPACE, so your job can access it
    - uses: actions/checkout@v3

    - name: Setup Python
      uses: actions/setup-python@v3
      with:
      # Version range or exact version of a Python version to use, using SemVer's version range syntax.
        python-version: 3.8

    # Download the Databricks CLI. See https://github.com/databricks/setup-cli
    - uses: databricks/setup-cli@main

    - name: Install mods
      run: |
        pip install pytest setuptools wheel

    - name: Extract branch name
      shell: bash
      run: echo "##[set-output name=branch;]$(echo ${GITHUB_REF#refs/heads/})"
      id: extract_branch

    - name: Update Databricks Git folder
      run: |
        databricks repos update ${{env.REPO_PATH}} --branch "${{ steps.extract_branch.outputs.branch }}"

    - name: Build Wheel and send to Databricks DBFS workspace location
      run: |
        cd $GITHUB_WORKSPACE
        python setup.py bdist_wheel
        dbfs cp --overwrite ./dist/* ${{env.DBFS_LIB_PATH}}
        # there is only one wheel file; this line copies it with the original version number in file name and overwrites if that version of wheel exists; it does not affect the other files in the path
        dbfs cp --overwrite ./dist/* ${{env.DBFS_LIB_PATH}}${{env.LATEST_WHEEL_NAME}} # this line copies the wheel file and overwrites the latest version with it
Update the following environment variable values with your own:
DBFS_LIB_PATH: The path in DBFS to the libraries (wheels) you will use in this automation, which starts with
dbfs:. For example,dbfs:/mnt/myproject/libraries.REPO_PATH: The path in your Databricks workspace to the Git folder where notebooks will be updated.
LATEST_WHEEL_NAME: The name of the last-compiled Python wheel file (
.whl). This is used to avoid manually updating wheel versions in your Databricks jobs. For example,your_wheel-latest-py3-none-any.whl.
Select Commit changes… to commit the script as a GitHub Actions workflow. After the pull request for this workflow is merged, go to the Actions tab of the Git repository and confirm that the actions are successful.