Databricks Connect for Scala
Note
This article covers Databricks Connect for Databricks Runtime 13.3 LTS and above.
This article demonstrates how to quickly get started with Databricks Connect by using Scala with IntelliJ IDEA and the Scala plugin.
For the Python version of this article, see Databricks Connect for Python.
For the R version of this article, see Databricks Connect for R.
Databricks Connect enables you to connect popular IDEs such as IntelliJ IDEA, notebook servers, and other custom applications to Databricks clusters. See What is Databricks Connect?.
Tutorial
To skip this tutorial and use a different IDE instead, see Next steps.
Requirements
To complete this tutorial, you must meet the following requirements:
Your target Databricks workspace and cluster must meet the requirements for Compute configuration for Databricks Connect.
You must have your cluster ID available. To get your cluster ID, in your workspace, click Compute on the sidebar, and then click your cluster’s name. In your web browser’s address bar, copy the string of characters between
clustersandconfigurationin the URL.You have the Java Development Kit (JDK) installed on your development machine. Databricks recommends that the version of your JDK installation that you use matches the JDK version on your Databricks cluster. The following table shows the JDK version for each supported Databricks Runtime.
Databricks Runtime version
JDK version
13.3 LTS - 15.0, 13.3 ML LTS - 15.0 ML
JDK 8
16.0
JDK 17
Note
If you do not have a JDK installed, or if you have multiple JDK installs on your development machine, you can install or choose a specific JDK later in Step 1. Choosing a JDK install that is below or above the JDK version on your cluster might produce unexpected results, or your code might not run at all.
You have IntelliJ IDEA installed. This tutorial was tested with IntelliJ IDEA Community Edition 2023.3.6. If you use a different version or edition of IntelliJ IDEA, the following instructions might vary.
You have the Scala plugin for IntelliJ IDEA installed.
Step 1: Configure Databricks authentication
This tutorial uses Databricks OAuth user-to-machine (U2M) authentication and a Databricks configuration profile for authenticating with your Databricks workspace. To use a different authentication type instead, see Configure connection properties.
Configuring OAuth U2M authentication requires the Databricks CLI, as follows:
If it is not already installed, install the Databricks CLI as follows:
Use Homebrew to install the Databricks CLI by running the following two commands:
brew tap databricks/tap
brew install databricks
You can use winget, Chocolatey or Windows Subsystem for Linux (WSL) to install the Databricks CLI. If you cannot use
winget, Chocolatey, or WSL, you should skip this procedure and use the Command Prompt or PowerShell to install the Databricks CLI from source instead.Note
Installing the Databricks CLI with Chocolatey is Experimental.
To use
wingetto install the Databricks CLI, run the following two commands, and then restart your Command Prompt:winget search databricks winget install Databricks.DatabricksCLI
To use Chocolatey to install the Databricks CLI, run the following command:
choco install databricks-cli
To use WSL to install the Databricks CLI:
Install
curlandzipthrough WSL. For more information, see your operating system’s documentation.Use WSL to install the Databricks CLI by running the following command:
curl -fsSL https://raw.githubusercontent.com/databricks/setup-cli/main/install.sh | sh
Confirm that the Databricks CLI is installed by running the following command, which displays the current version of the installed Databricks CLI. This version should be 0.205.0 or above:
databricks -vNote
If you run
databricksbut get an error such ascommand not found: databricks, or if you rundatabricks -vand a version number of 0.18 or below is listed, this means that your machine cannot find the correct version of the Databricks CLI executable. To fix this, see Verify your CLI installation.
Initiate OAuth U2M authentication, as follows:
Use the Databricks CLI to initiate OAuth token management locally by running the following command for each target workspace.
In the following command, replace
<workspace-url>with your Databricks workspace instance URL, for examplehttps://1234567890123456.7.gcp.databricks.com.databricks auth login --configure-cluster --host <workspace-url>
The Databricks CLI prompts you to save the information that you entered as a Databricks configuration profile. Press
Enterto accept the suggested profile name, or enter the name of a new or existing profile. Any existing profile with the same name is overwritten with the information that you entered. You can use profiles to quickly switch your authentication context across multiple workspaces.To get a list of any existing profiles, in a separate terminal or command prompt, use the Databricks CLI to run the command
databricks auth profiles. To view a specific profile’s existing settings, run the commanddatabricks auth env --profile <profile-name>.In your web browser, complete the on-screen instructions to log in to your Databricks workspace.
In the list of available clusters that appears in your terminal or command prompt, use your up arrow and down arrow keys to select the target Databricks cluster in your workspace, and then press
Enter. You can also type any part of the cluster’s display name to filter the list of available clusters.To view a profile’s current OAuth token value and the token’s upcoming expiration timestamp, run one of the following commands:
databricks auth token --host <workspace-url>databricks auth token -p <profile-name>databricks auth token --host <workspace-url> -p <profile-name>
If you have multiple profiles with the same
--hostvalue, you might need to specify the--hostand-poptions together to help the Databricks CLI find the correct matching OAuth token information.
Step 2: Create the project
Start IntelliJ IDEA.
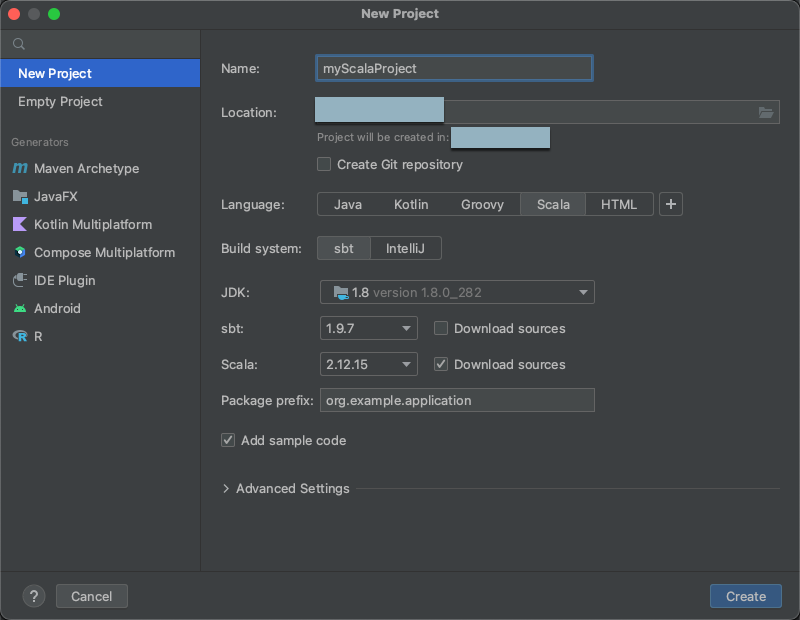
On the main menu, click File > New > Project.
Give your project some meaningful Name.
For Location, click the folder icon, and complete the on-screen directions to specify the path to your new Scala project.
For Language, click Scala.
For Build system, click sbt.
In the JDK drop-down list, select an existing installation of the JDK on your development machine that matches the JDK version on your cluster, or select Download JDK and follow the on-screen instructions to download a JDK that matches the JDK version on your cluster.
Note
Choosing a JDK install that is above or below the JDK version on your cluster might produce unexpected results, or your code might not run at all.
In the sbt drop-down list, select the latest version.
In the Scala drop-down list, select the version of Scala that matches the Scala version on your cluster. The following table shows the Scala version for each supported Databricks Runtime:
Databricks Runtime version
Scala version
13.3 LTS - 15.0, 13.3 ML LTS - 15.0 ML
2.12.15
Note
Choosing a Scala version that is below or above the Scala version on your cluster might produce unexpected results, or your code might not run at all.
Make sure the Download sources box next to Scala is checked.
For Package prefix, enter some package prefix value for your project’s sources, for example
org.example.application.Make sure the Add sample code box is checked.
Click Create.

Step 3: Add the Databricks Connect package
With your new Scala project open, in your Project tool window (View > Tool Windows > Project), open the file named
build.sbt, in project-name > target.Add the following code to the end of the
build.sbtfile, which declares your project’s dependency on a specific version of the Databricks Connect library for Scala:libraryDependencies += "com.databricks" % "databricks-connect" % "14.3.1"
Replace
14.3.1with the version of the Databricks Connect library that matches the Databricks Runtime version on your cluster. You can find the Databricks Connect library version numbers in the Maven central repository.Click the Load sbt changes notification icon to update your Scala project with the new library location and dependency.
Wait until the
sbtprogress indicator at the bottom of the IDE disappears. Thesbtload process might take a few minutes to complete.

Step 4: Add code
In your Project tool window, open the file named
Main.scala, in project-name > src > main > scala.Replace any existing code in the file with the following code and then save the file, depending on the name of your configuration profile.
If your configuration profile from Step 1 is named
DEFAULT, replace any existing code in the file with the following code, and then save the file:package org.example.application import com.databricks.connect.DatabricksSession import org.apache.spark.sql.SparkSession object Main { def main(args: Array[String]): Unit = { val spark = DatabricksSession.builder().remote().getOrCreate() val df = spark.read.table("samples.nyctaxi.trips") df.limit(5).show() } }
If your configuration profile from Step 1 is not named
DEFAULT, replace any existing code in the file with the following code instead. Replace the placeholder<profile-name>with the name of your configuration profile from Step 1, and then save the file:package org.example.application import com.databricks.connect.DatabricksSession import com.databricks.sdk.core.DatabricksConfig import org.apache.spark.sql.SparkSession object Main { def main(args: Array[String]): Unit = { val config = new DatabricksConfig().setProfile("<profile-name>") val spark = DatabricksSession.builder().sdkConfig(config).getOrCreate() val df = spark.read.table("samples.nyctaxi.trips") df.limit(5).show() } }
Step 5: Run the code
Start the target cluster in your remote Databricks workspace.
After the cluster has started, on the main menu, click Run > Run ‘Main’.
In the Run tool window (View > Tool Windows > Run), on the Main tab, the first 5 rows of the
samples.nyctaxi.tripstable appear.
Step 6: Debug the code
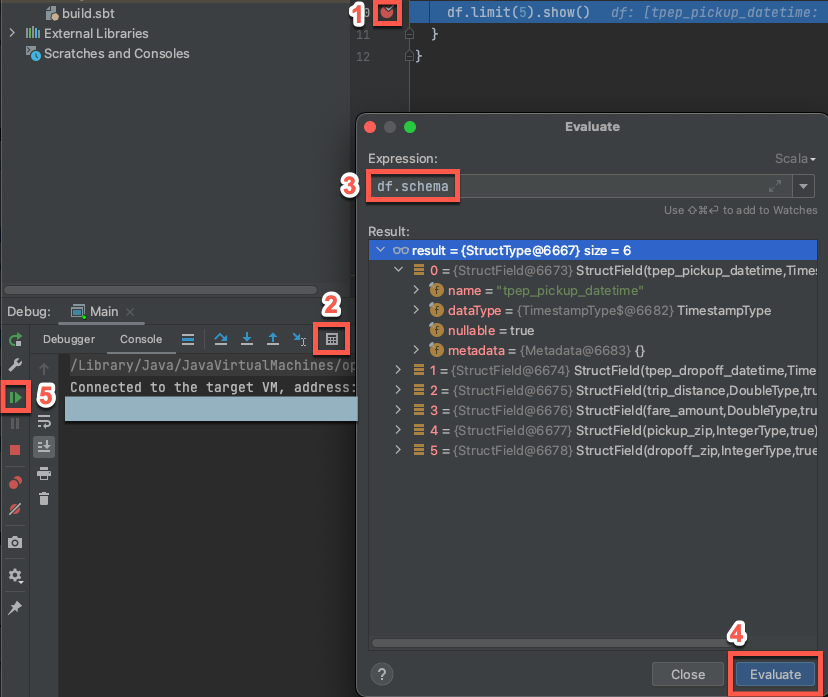
With the target cluster still running, in the preceding code, click the gutter next to
df.limit(5).show()to set a breakpoint.On the main menu, click Run > Debug ‘Main’.
In the Debug tool window (View > Tool Windows > Debug), on the Console tab, click the calculator (Evaluate Expression) icon.
Enter the expression
df.schemaand click Evaluate to show the DataFrame’s schema.In the Debug tool window’s sidebar, click the green arrow (Resume Program) icon.
In the Console pane, the first 5 rows of the
samples.nyctaxi.tripstable appear.

Next steps
To learn more about Databricks Connect, see articles such as the following:
To use Databricks authentication types other than a Databricks personal access token, see Configure connection properties.
To use other IDEs, see the following:
To view additional simple code examples, see Code examples for Databricks Connect for Scala.
To view more complex code examples, see the example applications for Databricks Connect repository in GitHub, specifically:
To migrate from Databricks Connect for Databricks Runtime 12.2 LTS and below to Databricks Connect for Databricks Runtime 13.3 LTS and above, see Migrate to Databricks Connect for Scala.
See also information about troubleshooting and limitations.